SimpleDBM Developers’s Guide
| Author: | Dibyendu Majumdar |
|---|---|
| Contact: | d dot majumdar at gmail dot com |
| Date: | 7 April 2009 |
| Version: | 1.0.12 |
| Copyright: | Copyright by Dibyendu Majumdar, 2005-2016 |
Contents
- SimpleDBM Developers’s Guide
- Introduction
- Data Manager/RSS Components
- Object Registry
- Storage Factory
- Latch Manager
- Log Manager
- Lock Manager
- Introduction
- Locking Basics
- Two-Phase Locking and Repeatable Read Isolation Level
- Read Committed Isolation Level
- Serializable Isolation Level
- Design choices
- Lock Modes
- Operations
- Obtaining an instance of Lock Manager
- Lockable objects
- Lock Owners
- Lock Durations
- Acquiring and releasing locks
- Algorithm
- Data Structures of the Lock Manager
- Deadlock Detector
- Page Manager
- Buffer Manager
- Transaction Manager
- Introduction
- Overiew
- What is ARIES?
- ARIES - An Overview
- Features of ARIES
- Key differences from ARIES
- Transactions and Locks
- Transactions and Modules
- Transactions and Log records
- The Loggable hierarchy
- Loggable Hierarchy
- Transaction Manager Internal Log Records
- Redoable
- BaseLoggable abstract class
- PageFormatOperation
- MultiPageRedo
- Undoable
- Physical Undos
- SinglePageLogicalUndos
- LogicalUndos
- Comments about implementing undo operations
- Compensation records
- NonTransactionRelatedOperations
- PostCommitActions
- ContainerDeleteOperations
- ContainerOpenOperations
- Space Manager
- Slotted Page Manager
- Index Manager
- Overview
- Challenges with B-Tree Concurrency
- Structure of the B-link Tree
- Structure of Nodes
- Key Differences from published algorithm
- Support for Non-Unique indexes
- Handling of storage map
- Variable length keys
- Page Split operation
- Merge Operation
- Link Operation
- Unlink Operation
- Redistribute Keys Operation
- Increase Tree Height Operation
- Decrease Tree Height Operation
- Index Scans
- Simplified Algorithm for Scans
- Simpler page modification checks
- B-Tree index is a secondary structure
- Tuple Manager
Introduction
This document describes the SimpleDBM Internals.
Intended Audience
This documented is targetted at SimpleDBM developers.
Pre-requisite Reading
Before reading this document, the reader is advised to go through the SimpleDBM Overview document.
Data Manager/RSS Components
The Data Manager/Relational Storage system (RSS) consists of the components listed in the table given below.
| Module Name | Description |
|---|---|
| Logging | Provides a Logger interface that hides the implementation details. Can wrap either JDK logging or Log4J. |
| Utility | Contains miscellaneous utility classes. |
| Registry | Provides the Object Registry, which is a factory for creating objects based on type code. |
| Storage Manager | Provides an abstraction for input/output of storage containers similar to files. |
| Latch | Provides read/write locks that can be used to manage concurrency. |
| Lock Manager | Implements a Lock Scheduler that allows locking of arbitrary objects. Several different lock modes are supported. |
| Page Manager | The Page Manager defines the page size and provides mapping of pages to storage containers. |
| Buffer Manager | The Buffer Manager module implements the Page Cache where recently accessed pages are stored temporarily. |
| Log Manager | The Write Ahead Log Manager is used for recording changes made to the database for recovery purposes. |
| Transaction Manager | The Transaction Manager manages transactions, system restart and recovery. |
| Free Space Manager | The Free Space Manager is responsible for managing free space information in storage containers. |
| Slotted Page Manager | The Slotted Page Manager provides an common implementation of pages containing multiple records. A slot table is used to provide a level of indirection to the records. This allows records to be moved within the page without affecting clients. |
| Location | The Location module specifies the interface for identifying lockable records in storage containers. |
| Index Manager | Provides efficient structures for accessing locations based upon key values. |
| Tuple Manager | Provides an implementation of tuple containers. A tuple is defined as variable sized blob of data that has a unique identity within the tuple container. |
| Server | This brings together all the other modules and provides overall management of the SimpleDBM RSS database engine. |
Object Registry
Overview
SimpleDBM uses a custom serialization mechanism for marshalling and unmarshalling objects to/from byte streams. When an object is marshalled, a two-byte code is stored in the first two bytes of the byte stream [1]. This identifies the class of the stored object. When reading back, the type code is used to lookup a factory for creating the object of the correct class.
| [1] | In some cases the type code is not stored, as it can be determined through some other means. |
The SimpleDBM serialization mechanism does not use the Java Serialization framework.
Central to the SimpleDBM serialization mechanism is the ObjectRegistry
module. The ObjectRegistry provides the coupling between SimpleDBM
serialization mechanism and its clients. For instance, index key
types, table row types, etc. are registered in SimpleDBM’s
ObjectRegistry and thereby made available to SimpleDBM. You will
see how this is done when we discuss Tables and
Indexes.
To allow SimpleDBM to serialize and deserialize an object from a byte-stream, you must:
- Assign a unique 2-byte (short) type code to the class. Because the type code gets recorded in persistent storage, it must be stable, i.e., once registered, the type code association for a class must remain constant for the life span of the the database.
- Ensure that the class implements a constructor that takes a ByteBuffer argument. The constructor should expect the first two bytes to contain the typecode for the class.
- Ensure that the class implements the Storable interface. The stored length of an object of the class must allow for the 2-byte type code.
- Provide an implementation of the
org.simpledbm.rss.api.registry.ObjectFactoryinterface, and register this implementation with theObjectRegistry.
An important consideration is to ensure that all the required classes are available to a SimpleDBM RSS instance at startup.
A limitation of the current design is that the type registrations are
not held in persistent storage. Since all type mappings must be available
to SimpleDBM server when it is starting up (as these may be involved
in recovery) you need to ensure that custom type mappings are registered
to the ObjectRegistry immediately after the server instance is constructed, but
before the server is started. Typically this is handled by requiring
each module to register its own types.
Type codes between the range 0-1000 are reserved for use by SimpleDBM.
Two Use cases
The ObjectRegistry supports two use cases.
- The first use case is where the client registers an
ObjectFactoryimplementation. In this case,ObjectRegistrycan construct the correct object from a byte stream on request. By taking care of the common case, the client code is simplified. - The second case is when the client has a more complex requirement
and wants to manage the instantiation of objects. In this scenario,
the client registers a singleton class and associates this with the
type code. The
ObjectRegistrywill return the registered singleton object when requested.
Registering an ObjectFactory
In the simple case, an ObjectFactory implementation needs to be
registered for a particular type code.
In the example shown below, objects of the class MyObject
are to be persisted:
public final class MyObject implements Storable {
  final int value;

  /**
   * Constructs a MyObject from a byte stream.
   */
  public MyObject(ByteBuffer buf) {
    // skip the type code
    buf.getShort();
    // now get the value
    value = buf.getInt();
  }

  /* Storable methods not shown */
}
Points worth noting are:
- The
MyObjectclass provides a constructor that takes aByteBufferas an argument. This is important as it allows the object to use final fields, allowing the class to be immutable. - The constructor skips the first two bytes which contain the type code.
We need an ObjectFactory implementation that constructs the MyObject
instances. The implementation is relatively straightforward:
class MyObjectFactory implements ObjectFactory {
  Object getInstance(ByteBuffer buf) {
    return new MyObject(buf);
  }
}
Next, we register the ObjectFactory implementation with the ObjectRegistry.:
objectRegistry.registerObjectFactory(1, new MyObjectFactory());
Given above registration, it is possible to construct MyObject instances as follows:
ByteBuffer buf = ...;
MyObject o = (MyObject) objectRegistry.getInstance(buf);
This pattern is used throughout SimpleDBM RSS.
Asymmetry between retrieving and storing objects
The reader may have noticed that the ObjectFactory says
nothing about how objects are marshalled into a byte stream.
It only deals with the unmarshalling of objects.
The marshalling is handled by the object itself. All objects that support marshalling are required to implement the Storable interface.
Storable Interface and Object serialization
Classes that need serialization support should implement
the interface org.simpledbm.rss.api.registry.Storable.
The Storable interface requires the object
to be able to predict its persistent size in bytes when the
getStoredLength() method is invoked. It also requires the
implementation to be able to stream itself to a ByteBuffer.
The Storable interface specification is as follows:
/**
 * A Storable object can be written to (stored into) or
 * read from (retrieved from) a ByteBuffer. The object
 * must be able to predict its length in bytes;
 * this not only allows clients to allocate ByteBuffer
 * objects of suitable size, it is also be used by a
 * StorageContainer to ensure that objects can be
 * restored from secondary storage.
 */
public interface Storable {

  /**
   * Store this object into the supplied ByteBuffer in
   * a format that can be subsequently used to reconstruct the
   * object. ByteBuffer is assumed to be setup
   * correctly for writing.
   *
   * @param bb ByteBuffer that will contain a stored
   *           representation of the object.
   */
  void store(ByteBuffer bb);

  /**
   * Predict the length of this object in bytes when
   * stored in a ByteBuffer.
   *
   * @return The length of this object when stored in
   *         a ByteBuffer.
   */
  int getStoredLength();
}
The implementation of the store() method must be the inverse
of the constructor that takes the ByteBuffer argument.
A complete example of the MyObject class will look like
this:
public final class MyObject implements Storable {
  final int value;

  /**
   * Constructs a MyObject from a byte stream.
   */
  public MyObject(ByteBuffer buf) {
    // skip the type code
    buf.getShort();
    // now get the value
    value = buf.getInt();
  }

  public int getStoredLength() {
    return 6;
  }

  /**
   * Serialize to a ByteBuffer object.
   */
  public void store(ByteBuffer bb) {
    bb.putShort((short) 1);
    bb.putInt(value);
  }
}
Registering Singletons
In some cases, the requirements for constructing objects are complex
enough for the client to manage it itself. In this case, the client
provides a singleton object that is registered with the ObjectRegistry.
The ObjectRegistry.getSingleton(int typecode) method retrieves the
Singleton object. Typically, the singleton is a factory class that can
be used to create new instances of objects.
Historical Note
The initial design of SimpleDBM’s ObjectRegistry used reflection
to create instances of objects. Instead of registering factory classes,
the name of the target class was registered.
The unmarshalling of objects was performed in two steps. First, the no-arg constructor was invoked to construct the object. Then a method on the Storable interface was invoked to deserialize the object’s fields from the ByteBuffer.
This method was abandoned in favour of the current approach due to following problems.
- Firstly, it required that all classes that participated in the persistence mechanism support a no-arg constructor.
- Fields could not be final, as the fields needed to be initialized post construction. As a result, persistent classes could not be immutable.
- It was difficult to supply additional arguments (context information) to the constructed objects. This was because the object was constructed by a third-party, which had no knowledge about the object.
- It used reflection to construct objects.
The current method overcomes these problems, and has resulted in more robust code.
Comparison with Apache Derby
Apache Derby has a similar requirement to marshall and unmarshall objects to/from a byte stream. The solution used by Derby is different from SimpleDBM in following ways.
- It uses a custom implementation of the Java Serialization mechanism.
- Reflection is used to obtain instances of objects.
- The type code database is hard-coded in a static class. In SimpleDBM, types are added by each module; there is no central hard-coded list of types.
Storage Factory
Overview
Database Managers typically use files to store various types of data, such as log files, data files, etc.. However, from the perspective of a DBMS, the concept of a file is a logical one; all the DBMS cares about is a named storage container that supports random positioned IO. As long as this requirement is met, it is not important whether a container maps to a file or to some other device.
The objective of the StorageFactory package is to provide a level of abstraction to the rest of the DBMS so that the mapping of a container to a file becomes an implementation artefact. If desired, containers may be mapped to raw devices, or to segments within a file.
Storage Containers
A Storage Container is a named entity that supports positioned (random) Input/Output. The default implementation maps a container to a file, but this is an implementation detail, and not a requirement. The rest of the system does not need to know what the storage container maps to.
The operations on storage containers are similar to those that can be performed on files.
In SimpleDBM, each table or index maps to a single storage container. The Write Ahead Log also uses storage containers to store its data. Table and index containers have fixed size pages. The Write Ahead Log contains variable size records.
Storage Container Registry
Container names are usually not good identifiers for the rest of the
system. Integer identifiers are better, especially when other
objects need to refer to specific containers. Integers take less
amount of storage, and also remove the dependency between the
container’s name and the rest of the system. To support this
requirement, the org.simpledbm.rss.api.st.StorageManager
interface is provided, which maintains a mapping of
StorageContainers to integer identifiers. Note that the Storage
sub-system does not decide how to map the containers to ids; it
merely enables the registration of these mappings and allows
StorageContainer objects to be retrieved using their numeric
identifiers.
StorageContainerFactory storageFactory
   = new FileStorageContainerFactory();
StorageManager storageManager = new StorageManagerImpl();
StorageContainer sc = storageFactory.open("dual");
storageManager.register(0, sc);
Above sample code registers the container named “dual” to the storage manager and identifies this with the integer value 0. Other modules may obtain access to the storage container as follows:
StorageContainer sc = storageManager.getInstance(0);
Default Implementation
The default implementation of the StorageFactory uses a
RandomAccessFile as the underlying container. A few
configuration options are supported to allow changing the
behaviour of certain performance sensitive operations. These
are listed below.
| Option | Description |
|---|---|
| storage.basePath | This is used to specify the base directory relative to which all storage container instances are to be created. |
| storage.createMode | This is used to set the RandomAccessFile
mode that is used when creating a container. |
| storage.openMode | This is used to set the RandomAccessFile
mode when a container is opened. |
| storage.flushMode | The flushMode has two values: force.true causes force(true) to be invoked on the file channel when the container is flushed. force.false causes force(false) to be ivoked. A missing flushMode causes the call to force() to do nothing. |
Note that some of the modes can have a big impact on performance of SimpleDBM.
Latch Manager
Overview
A Latch is an efficient lock that is used by the system to manage concurrent access to physical structures. In many ways, Latches are similar to Mutexes, however, latches supports additional lock modes, such as Shared locks and Update locks.
Latch modes
SimpleDBM implements two types of latches. A ReadWrite Latch supports two lock modes:
- Shared mode
- is compatible with Shared mode but incompatible with Exclusive
- Exclusive mode
- incompatible with any other mode.
A ReadWriteUpdate latch is an enhanced version that supports an additional Update mode lock.
- Update mode
- compatible with Shared mode but incompatible with Update or Exclusive modes. Note that the Shared mode locks are incompatible with Update mode locks.
An Update lock may be upgraded to Exclusive lock, and conversely, an Exclusive lock may be downgraded to an Update lock. An Update lock may also be downgraded to a Shared lock.
Implementation and Performance Notes
The SimpleDBM Latch interface is designed to be compatible with the
Java 5.0 ReentrantReadWriteLock interface. This allows the ReadWrite
Latch implementation to be based upon the Java primitive.
The ReadWrite Latch is likely to be more efficient than the
ReadWriteUpdate Latch.
The ReadWriteUpdate latch implementation uses a subset of the LockManager implementation
described later in this document. There are a few differences between the two
implementations:
- Unlike a Lock, which has to be looked up dynamically in a hash table, a latch is known to its client, and hence no lookup is necessary. Each instance of a latch is a lock. Clients hold a reference to the latch.
- There is no support for various lock durations as these do not make sense here.
- Apart from lock conversions and downgrades, we also support lock upgrades. An upgrade is like a conversion except that it is explicitly requested and does not cause the reference count to go up. Hence the difference is primarily in the way clients use locks. For normal lock conversions, clients are expected to treat each request as a separate request, and therefore release the lock as many times as requested. Upgrade (and downgrade) requests do not modify the reference count.
- Unlike Lock Manager, the owner for latches is predefined - it is always the requesting thread. Hence there is no need to supply an owner.
- Latches do not support deadlock detection. The implementation uses a timeout of 10 seconds which is a simple way of detecting latch deadlocks. Note that Latch deadlocks are always due to bugs in the code, and should never occur at runtime. Such deadlocks are avoided by ensuring that latches are acquired and released in a specific order.
Obtaining a latch instance
SimpleDBM implements a factory class for creating Latch objects. The factory supports instantiating a ReadWrite latch, or a ReadWriteUpdate latch. There is also a default mode which results in ReadWrite latch.
Log Manager
Overview
The Write Ahead Log plays a crucial role in a DBMS. It provides the basis for recoverability. It is also a critical part of the system that has a massive impact on performance of an OLTP system.
Conceptually, the Log can be thought of as an ever growing sequential file. In the form of Log Records, the Log contains a history of all changes made to the database. Each Log Record is uniquely identified by a number called the Log Sequence Number (LSN). The LSN is designed in such a way that given an LSN, the system can locate the corresponding Log Record quickly. LSNs are assigned in strict ascending order (monotonicity). This is an important property when it comes to recovery.
During the progress of a Transaction, the a DBMS records in the Log all the changes made by the transaction. The Log records can be used to recover the system if there is a failure, or they can be used to undo the changes made by a transaction.
Initially, Log Records are stored in memory. They are flushed to disk during transaction commits, and also during checkpoints. In the event of a crash, it is possible to lose the log records that were not flushed to disk. This does not cause a problem, however, because by definition these log records must correspond to changes made by incomplete transactions. Also, the WAL protocol (described below) ensures that such Log records do not contain changes that have already been persisted within the database.
Write Ahead Log (WAL) Protocol
The WAL protocol requires the following conditions to hold true:
- All changes made by a transaction must be recorded in the Log and the Log must be flushed to disk before the transaction is committed.
- A database buffer page may not be modified until its modifications have been logged. A buffer page may not be saved to disk until all its associated log records have been saved to disk.
- While the buffer page is being modified and the Log is being updated, an Exclusive latch (a type of fast lock) must be held on the page to ensure that order in which changes are recorded in the Log correspond to the order in which they were made.
Consequences of above rules are:
- If a Log Record was not saved to disk, it can be safely ignored, because any changes contained in it are guaranteed to belong to uncommitted transactions. Also, such Log Records cannot represent changes that have been made persistent in the database.
- Log records represent changes to the system in the correct order. The latching protocol ensures that if two Log records represent changes to the same Page, then the ordering of these records reflects the order in which the changes were made to the page.
Advantages of WAL
Typically, in an OLTP system, updates tend to be random and can affect different parts of the disk at a point in time. In comparison, writes to the Log are always sequential. If it were necessary to flush all changes made by the DBMS to disk at commit time, it would have a massive impact on performance because of the randomness of the disk writes. However, in a WAL system, only the Log needs to be flushed to disk at Commit. Thus, the Log has the effect of transforming random writes into serial writes, thereby improving performance significantly.
Usage Notes
The Log Manager interface does not make any assumptions about log records. In fact, it does not specify the format of a log record.
SimpleDBM Implementation of the Log
The SimpleDBM Log maintains control information separately from log files. For safety, multiple copies of control information are stored (though at present, only the first control file is used when opening the Log).
Logically, the Log is organized as a never ending sequence of log records. Physically, the Log is split up into log files. There is a fixed set of online log files, and a dynamic set of archived log files. The set of online log files is called a Log Group.
Each Log Group consists of a set of pre-allocated log files of the same size. The maximum number of groups possible is 3, and the maximum number of log files within a group is 8. Note that each group is a complete set in itself - the Log is recoverable if any one of the groups is available, and if the archived log files are available. If more than one group is created, it is expected that each group will reside on a different disk sub-system.
The Log Groups are allocated when the Log is initially created. The log files within a group are also pre-allocated. However, the content of the online log files changes over time.
Logically, in the same way that the Log can be viewed as a sequence of Log Records, it can also be thought of as a sequence of Log Files. The Log Files are numbered in sequence, starting from 1. The Log File sequence number is called LogIndex. At any point in time, the physical set of online log files will contain a set of logical log files. For example, if there are 3 physical files in a Log Group, then at startup, the set of logical log files would be 1, 2 and 3. After some time, the log file 1 would get archived, and in its place a new logical log file 4 would be created. The set now would now consist of logical log files 2, 3 and 4.
When a log record is written to disk, it is written out to an online log file. If there is more than one group, then the log record is written to each of the groups. The writes happen in sequence to ensure that if there is a write failure, damage is restricted to one Log Group. Note that due to the way this works, having more than 1 group will slow down log writes. It is preferable to use hardware based disk mirroring of log files as opposed to using multiple log groups.
When new log records are created, they are initially stored in the log buffers. Log records are written out to log files either because of a client request to flush the log, or because of the periodic flush event.
During a flush, the system determines which log file to use. There is the notion of Current log file, which is where writes are expected to occur. If the current log file is full, it is put into a queue for archiving, and the log file is switched. Until an online log file has been archived, its physical file cannot be reused. A separate archive thread monitors archive requests and archives log files in the background.
Only one flush is permitted to execute at any point in time. Similarly, only one archive is permitted to execute at any point in time. However, multiple clients are allowed to concurrently insert and read log records, even while flushing and archiving is going on, except under following circumstances.
- Log inserts cannot proceed if the system has used up more memory than it should. In that case, it must wait for some memory to be freed up. To ensure maximum concurrency, the memory calculation is approximate.
- A Log flush cannot proceed if all the online log files are full. In this situation, the flush must wait for at least one file to be archived.
- When reading a log record, if the online log file containing the record is being archived, the reader may have to wait for the status of the log file to change, before proceeding with the read. Conversely, if a read is active, the archive thread must wait for the read to be over before changing the status of the log file.
If archive mode is ON, log files are archived before being re-used. Otherwise, they can be reused if the file is no longer needed - however this is currently not implemented. By default archive mode is ON.
Limitations of current design
A Log record cannot span log files, and it must fit within a single log buffer. Thus the size of a log record is limited by the size of a log buffer and by the size of a log file. As a workaround to this limitation, clients can split the data into multiple log records, but in that case, clients are responsible for merging the data back when reading from the Log.
Operations
Creating a new Log Instance
Several parameters must be supplied when creating a new log instance. These are specified using a Java Properties object.
| Property Name | Description |
|---|---|
log.ctl.{n} |
The fully qualified path to the
log control file. The first file should be specified as
log.ctl.1, second as log.ctl.2, and so on. Up to a
maximum of 3 can be specified. Default is 2. |
log.groups.{n}.path |
The path where log files of a group should be stored.
The first log group is specified as log.groups.1.path,
the second as log.groups.2.path,
and so on. Up to a maximum of 3 log groups can be
specified. Default number of groups is 1. Path defaults
to current directory. |
log.archive.path |
Defines the path for storing archive files. Defaults to current directory. |
log.group.files |
Specifies the number of log files within each group. Up to a maximum of 8 are allowed. Defaults to 2. |
log.file.size |
Specifies the size of each log file in bytes. Default is 2 KB. |
log.buffer.size |
Specifies the size of the log buffer in bytes. Default is 2 KB. |
log.buffer.limit |
Sets a limit on the maximum number of log buffers that can be allocated. Default is 10 * log.group.files. |
log.flush.interval |
Sets the interval (in seconds) between log flushes. Default is 6 seconds. |
log.disableFlushRequests |
Boolean value, if set, disables log flushes requested explicitly by the Buffer Manager or Transaction Manager. Log flushes still occur during checkpoints and log switches. By reducing the log flushes, performance is improved, but transactions may not be durable. Only those transactions will survive a system crash that have all their log records on disk. |
Here is an example:
LogFactory factory = new LogFactoryImpl();
Properties properties = new Properties();
properties.setProperty("log.ctl.1", "ctl.a");
properties.setProperty("log.ctl.2", "ctl.b");
properties.setProperty("log.groups.1.path", ".");
properties.setProperty("log.archive.path", ".");
properties.setProperty("log.group.files", "3");
properties.setProperty("log.file.size", "16384");
properties.setProperty("log.buffer.size", "16384");
properties.setProperty("log.buffer.limit", "4");
properties.setProperty("log.flush.interval", "30");
factory.createLog(properties);
Opening a log instance
Once a Log has been created, it can be opened for use. Opening the log also starts back ground threads that handle periodic log flushes and archival of log files. When the log is closed, the background threads are shut down.
Following sample code shows how this is done:
LogFactory factory = new LogFactoryImpl();
Properties properties = new Properties();
properties.setProperty("log.ctl.1", "ctl.a");
properties.setProperty("log.ctl.2", "ctl.b");
properties.setProperty("log.groups.1.path", ".");
properties.setProperty("log.archive.path", ".");
properties.setProperty("log.group.files", "3");
properties.setProperty("log.file.size", "16384");
properties.setProperty("log.buffer.size", "16384");
properties.setProperty("log.buffer.limit", "4");
properties.setProperty("log.flush.interval", "30");
LogMgr log = factory.openLog(properties);
try {
    // do some work
} finally {
    if (log != null)
        log.close();
}
Note the use of finally block to ensure that the log is properly closed.
Inserting new log records
The Log Manager does not care about the contents of the log record. It treats the contents as a byte stream. This is illustrated in the following example:
LogMgr log = factory.openLog(null);
try {
    String s = "hello world!";
    byte[] b = s.getBytes();
    Lsn lsn = log.insert(b, b.length);
} finally {
    if (log != null)
        log.close();
}
Each new log record is assigned a unique sequence number known as the Log Sequence Number (LSN). This can be used later on to retrieve the log record.
Flushing the Log
When new log records are created, initially they are stored in the Log Buffers. The log records are flushed to disk either upon request or by the background thread that periodically flushes the Log. Clients can request the log to be flushed upto a specified LSN. Note that this is a blocking call, i.e., the client will be blocked until the flush is completed.
Example:
String s = "hello world!";
byte[] b = s.getBytes();
Lsn lsn = log.insert(b, b.length);
log.flush(lsn);
Typically, flush requests are issued by Transaction Manager, when a transaction commits or aborts, or by the Buffer Manager when it is about to write a dirty buffer.
Reading Log records
Log records can be read individually or using a scan. The Log Manager allows both forward and backward scans of the Log. A starting LSN can be specified; if this is not specified then the scanning will begin from the first or last record, depending upon whether it is a forward or backward scan.
Shown below is an example of directly accessing a log record by its LSN:
Lsn myLsn = ...;
LogRecord logrec = log.read(myLsn);
byte[] data = logrec.getData();
Shown below is an example of using the Log Scan facility:
void readAllRecords(LogMgr log) throws Exception {
    LogReader reader = log.getForwardScanningReader(null);
    try {
        for (;;) {
            LogRecord rec = reader.getNext();
            if (rec == null) {
                break;
            }
            printRecord(rec);
        }
    }
    finally {
        if (reader != null)
            reader.close();
    }
}
Checkpoint Records
In transactional systems there is often a need to maintain special checkpoint records that contain a snapshot of the system at a point in time. Checkpoint records can be handled in the same way as normal log records, however, the Log Manager also maintains information about the most recent checkpoint record. Whenever a checkpoint record is written, the Log Manager should be informed about its LSN. This ensures that at the next flush, the Log Control files are updated.
CheckpointRecord checkpointRec = new CheckpointRecord();
Lsn checkpointLsn = log.insert(checkpointRec.getData(),
        checkpointRec.getLength());
logmgr.setCheckpointLsn(checkpointLsn);
logmgr.flush(checkpointLsn);
The LSN of the last checkpoint record can be retrieved at any time using the getCheckpointLsn() method. Note that if the Checkpoint Record is too large and needs to be broken up into smaller records, then the checkpointLsn should be set to the first checkpoint record.
Lock Manager
Introduction
All multi-user transactional systems use some form of locking to ensure that concurrent transactions do not conflict with each other. Depending upon the level of consistency guaranteed by the transactional system the number and type of locks used can vary.
In a single user system, no locking is needed. Transaction are automatically consistent, as only one transaction can execute at any point in time.
Locking Basics
In multi-user systems, transactions must be allowed to proceed concurrently if reasonable performance is to be obtained. However, this means that unless some form of locking is used, data consistency problems will arise. For example, if two transactions update the same record at the same time, one of the updates may be lost.
To prevent this sort of thing from happening, each transaction must lock the data that it updates or reads. A lock is a mechanism by which access to the record is restricted to the transaction that owns the lock. Furthermore, a lock restricts the type of operation that is permitted to occur. For example, a Shared lock can be owned by multiple transactions concurrently and allows read operations. An Exclusive lock permits both read and write operations but can only be granted to one transaction at any point on time. Moreover Shared locks and Exclusive locks are incompatible; this means that if a Shared Lock is held by a transaction on a record, another transaction cannot obtain an Exclusive lock on the same record, and vice-versa.
Two-Phase Locking and Repeatable Read Isolation Level
Not only must a record be locked when it is updated, the transaction must hold the lock until the transaction is committed or aborted. This strategy leads to the basic rule of two-phase locking, which requires that a transaction must manage its locks in two distinct phases. In the first phase, the transaction is permitted to acquire locks, but cannot release any locks. The first phase lasts right up to the moment the transaction is completed, i.e., either committed or aborted. In the second phase, when the transaction is committed or aborted, all locks are released. No further locks can be acquired in this phase. Strict two phase locking ensures that despite concurrent running of transactions, each transaction has the appearance of running in isolation. Strict two-phase locking strategy provides a level of consistency called Repeatable Read.
Read Committed Isolation Level
This basic strategy can be modified to obtain greater concurrency at the cost of data consistency. For example, read locks can be released early to allow other transactions to read data. While this increases concurrency, it does mean that reads are not repeatable, because the original transaction may find that the data it read previously has been modified by the time it is read a second time. This level of consistency is known as Read Committed.
Serializable Isolation Level
Although the Repeatable Read level of consistency prevents data that has been read by one transaction from being modified by another, it does not prevent the problem of phantom reads, which occurs when new records are inserted. For example, if a range of records is read twice by the same transaction, and another transaction has inserted new records in the time interval between the two reads, then the second read will encounter records that did not appear the first time. To prevent this type of phantom reads from occurring, locking has to be made even more comprehensive. Rather than locking one record, certain operations need to lock entire ranges of records, even non-existent ones. This is typically achieved using a logical convention; a lock on a particular data item represents not only a lock on that data, but also the range of data up to and including the data item being locked. For example, if there are two records A and C, then a lock on C would encompass the entire range of data between A and C, excluding A, but including and up to C.
Design choices
The Locking subsystem specified in SimpleDBM requires that locks should be implemented independently of the objects being locked. In order for locking to work, all participants must agree to agree to use the locking system and abide by the rules.
Another design constraint is that the interface is geared towards a memory based implementation. This places a constraint on the number of locks that can be held within the system, because a large number of locks would require a prohibitively large amount of memory.
Some database systems, Oracle, in particular, use markers within the databases disk pages to represent locks. A lock byte is used, for instance, to denote whether a row is locked or not. The advantage of Oracle’s approach is that there are no constraints on the number of locks the system can handle. The disadvantage is that the lock status is maintained in persistent storage, therefore changing the lock status can make a page dirty. Oracle overcomes this issue in two ways. Firstly, it uses a multi-version system that does not require read locks. Thus, locks are used only for updates, and since updates cause database pages to be touched anyway, using a lock status byte does not pose a problem. Secondly, Oracle avoids updating the lock status byte when locks are released, by using information about the transaction status to infer that a lock has been released.
The interface for the Locking System specified in this package does not support implementations of the type used in Oracle.
In some systems, locking is based upon facilities provided by the underlying operating system. For instance, most operating systems support some form of file locking. Since database records are laid out into regions within a file system, file system locks can be applied on records. This is not the best way of implementing locks. This is because locking a region in the file would prevent all access to that region, which would cause other problems. Even when systems do use file system locks, typically, some form of logical locking is used. For example, in DBASE III based systems, a single byte in the file represents a record lock. In general, relying upon file system locks can be source of numerous problems, such as portability of the system, performance, etc.
Lock Modes
The SimpleDBM Lock Manager supports the following Lock Modes:
- INTENTION_SHARED
- Indicates the intention to read data at a lower level of granularity.
- INTENTION_EXCLUSIVE
- Indicates the intention to update data at a lower level of granularity.
- SHARED
- Permits readers.
- SHARED_INTENTION_EXCLUSIVE
- Indicates SHARED lock at current level and intention to update data at a lower level of granularity.
- UPDATE
- Indicates intention to update, Permits readers.
- EXCLUSIVE
- Prevents access by other users.
Lock Compatibility Matrix
The lock compatibility matrix for above is given below:
| Mode | NONE | IS | IX | S | SIX | U | X |
|---|---|---|---|---|---|---|---|
| NONE | Y | Y | Y | Y | Y | Y | Y |
| Intent Shared | Y | Y | Y | Y | Y | N | N |
| Intent Exclusive | Y | Y | Y | N | N | N | N |
| Shared | Y | Y | N | Y | N | N | N |
| Shared Intent Excluive | Y | Y | N | N | N | N | N |
| Update | Y | N | N | Y | N | N | N |
| Exclusive | Y | N | N | N | N | N | N |
Lock Conversions
SimpleDBM‘s Lock Manager also supports Lock Conversions. The following table shows how lock conversions are handled:
| Mode | NONE | IS | IX | S | SIX | U | X |
|---|---|---|---|---|---|---|---|
| NONE | NONE | IS | IX | S | SIX | U | X |
| Intent Shared | IS | IS | IX | S | SIX | U | X |
| Intent Exclusive | IX | IX | IX | SIX | SIX | X | X |
| Shared | S | S | SIX | S | SIX | U | X |
| Shared Intent Exclusive | SIX | SIX | SIX | SIX | SIX | SIX | X |
| Update | U | U | X | U | SIX | U | X |
| Exclusive | X | X | X | X | X | X | X |
Operations
Obtaining an instance of Lock Manager
SimpleDBM provides a factory class for generating instances of the Lock Manager. Note that locks are meaningful only within an instance of the Lock Manager – if there are two Lock Manager instances, each will have its own set of locks.
Following sample code shows how to obtain an instance of the Lock Manager.
LockMgrFactory factory = new LockMgrFactoryImpl();
Properties props = new Properties();
LockMgr lockmgr = factory.create(props);
The only property that can be set is the Hash Table size.
Lockable objects
Any object can be locked. The only requirement is that the object
should implement the hashCode() and equals() methods.
For the system to work correctly, lockable objects should be
immutable – once created they must not be modified. Clearly, if the
object is modified while it is referenced in the lock tables, then
the system will malfunction, as the object will no longer respond to
hashCode() and equals() in a consistent manner.
Lock Owners
Every lock must have an owner. The LockMgr interface allows any
object to be lock owner; the only requirement is that the object
must implement the equals() method.
Lock Durations
Locks can be acquired for an INSTANT_DURATION or
MANUAL_DURATION. Instant duration locks are not acquired in
reality – the caller is delayed until the lock becomes available.
Manual duration locks are held until they are released. Such locks
have a reference count attached to them. If the lock is acquired
more than once, the reference count is incremented. The lock will
not be released until the reference count becomes zero.
Typically, a Transaction will hold locks until the transaction ends. In some cases, SHARED locks may be released early, for example, in the READ COMMITTED Isolation Level.
Acquiring and releasing locks
Locks can be acquired using the acquire() method provided by
the LockMgr interface. The acquire method returns a Handle to the
lock, which can be used subsequently to release the lock. Example:
LockMgr lockmgr = new LockMgrImpl(71);
Object owner = new Integer(1);
Object lockname = new Integer(10);
LockHandle handle = lockmgr.acquire(owner, lockname,
    LockMode.EXCLUSIVE, LockDuration.MANUAL_DURATION, -1);
// do some work
handle.release(false);
Algorithm
The main algorithm for the lock manager is shown in the form of use cases. The description here is inspired by a similar description in [COCKBURN].
a001 - lock acquire
Main Success Scenario
- Search for the lock header
- Lock header not found
- Allocate new lock header
- Allocate new lock request
- Append lock request to queue with status = GRANTED and reference count of 1.
- Set lock granted mode to GRANTED
Extensions
- Lock header found but client has no prior request for the lock.
- Lock header found and client has a prior GRANTED lock request.
a003 - handle new request
Main Success Scenario
- Allocate new request.
- Append lock request to queue with reference count of 1.
- Check for waiting requests.
- Check whether request is compatible with granted mode.
- There are no waiting requests and lock request is compatible with granted mode.
- Set lock’s granted mode to maximum of this request and existing granted mode.
- Success.
Extensions
- There are waiting requests or lock request is not compatible with
granted mode.
- Do a004 - lock wait.
- There are waiting requests or lock request is not compatible with
granted mode.
a002 - handle lock conversion
Main Success Scenario
- Check lock compatibility with granted group.
- Lock request is compatible with granted group.
- Grant lock request, and update granted mode for the request.
Extensions
- Lock request is incompatible with granted group.
- Do a004 - lock wait.
- Lock request is incompatible with granted group.
a004 - lock wait
Main Success Scenario
- Wait for lock.
- Lock granted.
- Success.
Extensions
- Lock was not granted.
- Failure!
- Lock was not granted.
b001 - release lock
Main Success Scenario
- Decrease reference count.
- Sole lock request and reference count is zero.
- Remove lock header from hash table.
- Success.
Extensions
- Reference count greater than zero.
- Success.
- Reference count greater than zero.
- Reference count is zero and there are other requests on the lock.
- Remove request from the queue.
- Do b002 - grant waiters.
- Reference count is zero and there are other requests on the lock.
b002 - grant waiters
Main Success Scenario
- Get next granted lock.
- Recalculate granted mode.
- Repeat from 1) until no more granted requests.
- Get next waiting request.
- Request is compatible with granted mode.
- Grant request and wake up thread waiting for the lock. Increment reference count of the granted request and set granted mode to maximum of current mode and granted request.
- Repeat from 4) until no more waiting requests.
Extensions
- Conversion request.
- Do b003 - grant conversion request.
- Resume from 2).
- Conversion request.
- “conversion pending” is set (via b003).
- Done.
- “conversion pending” is set (via b003).
- Request is incompatible with granted mode.
- Done.
- Request is incompatible with granted mode.
b003 - grant conversion request
Main Success Scenario
- Do c001 - check request compatible with granted group.
- Request is compatible.
- Grant conversion request.
Extensions
- Conversion request incompatible with granted group.
- Set “conversion pending” flag.
- Conversion request incompatible with granted group.
c001 - check request compatible with granted group
Main Success Scenario
- Get next granted request.
- Request is compatible with this request.
- Repeat from 1) until no more granted requests.
Extensions
- Request belongs to the caller.
- Resume from step 3).
- Request belongs to the caller.
- Request is incompatible with this request.
- Failure!
- Request is incompatible with this request.
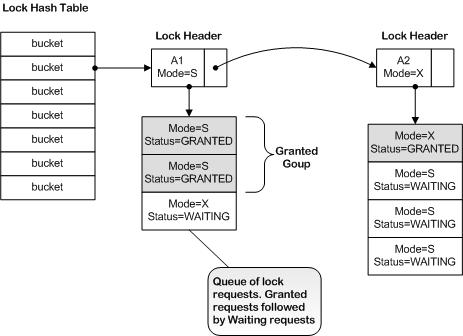
Data Structures of the Lock Manager
The Lock Manager data structures are based upon the structures described in [JGRAY]. A hash table is used to maintain a lookup table for finding lock objects. The buckets in the hash table point to linked lists of lock headers. Each lock header holds housekeeping information about a single lock. A chain of lock requests is attached to the lock header. Each request represents a lock request by a client. At any point in time, a lock may have multiple requests queuing - some in GRANTED state, others waiting for the lock to be GRANTED.
The data structure used by the Lock Manager is depicted below.
Deadlock Detector
The Lock Manager contains a simple Deadlock Detector implemented which is based upon algorithm described in [JGRAY]. The deadlock detector runs in a background thread, periodically waking up to check for deadlocks. When a deadlock is detected, one of the transactions (chosen arbitrarily) is aborted.
Page Manager
Overview of Page Manager module
The storage unit of a database system is a Page. In SimpleDBM, pages are contained with logical units called Storage Containers. The default implementation maps containers to Operating System files.
A page is typically a fixed size block within the storage container. The PageManager module encapsulates knowledge about how pages map to containers. It knows about the page size, but delegates the work of reading/writing pages to PageFactory implementations. This division of labour allows all pages to be centrally managed by the PageManager, yet allows new page types to be registered without having to change the PageManager. By isolating the management of pages into the PageManager module, the rest of the system is protected. For example, the BufferManager module can work with different paging strategies by switching the PageManager module.
Note that the PageManager module does not worry about the contents of the page, except for the very basic and common stuff that must be part of every page, such as a checksum, the page Id, page LSN, and the page type. It is expected that other modules will extend the basic page type and implement additional features. The PageManager does provide the base class for all Page implementations.
Interactions with other modules
The Buffer Manager module uses the PageManager module to read/write pages from storage containers and also to create new instances of pages.
The PageManager module requires the services of the Object Registry module in order to obtain PageFactory implementations.
The PageManager uses PageFactory implementations to read/write pages.
The PageManager module also interacts with the StorageManager module for access to Storage Containers.
Each page is allocated a Latch to manage concurrent access to it. The PageManager therefore requires the services of the Latch Manager.
Page class
The page manager provides an abstract Page class that is the root of the Page hierarchy. All other page types derive from this class. The simplest of Page classes that one could create is shown below:
public final class RawPage extends Page {
  RawPage(PageManager pageFactory, int type, PageId pageId) {
    super(pageFactory, type, pageId);
  }
  RawPage(PageManager pageFactory, PageId pageId, ByteBuffer bb) {
    super(pageFactory, pageId, bb);
  }
}
The constructor that accepts the ByteBuffer argument, should retrieve the contents of the Page from the ByteBuffer.
Page Size and implementation of Storable interface
The Page class implements the Storable interface. However, unlike other implementations, a Page has a fixed length which is defined by the PageManager responsible for creating it. The Page obtains the page size from the PageManager instance and uses that to determine its persistent size. Sub-classes cannot change this value. This means that the page size of all pages managed by a particular PageManager instance is always the same.
Sub-classes of course still need to implement their own store() method and a constructor that can initialize the object from a supplied ByteBuffer object. These methods should always invoke their super class counterparts before processing local content.
Example:
public class MyPage extends Page {
     int i = 0;

  MyPage(PageManager pageFactory, int type, PageId pageId) {
    super(pageFactory, type, pageId);
  }

  MyPage(PageManager pageFactory, PageId pageId, ByteBuffer bb) {
    super(pageFactory, pageId, bb);
    i = bb.getInt();
  }

  /**
   * @see org.simpledbm.rss.api.pm.Page#store(java.nio.ByteBuffer)
   */
  @Override
  public void store(ByteBuffer bb) {
    super.store(bb);
    bb.putInt(i);
  }
}
How various Page types are managed
Some of the SimpleDBM modules define their own page types. These page types are not known to the BufferManager or the TransactionManager, which must still handle such pages, even read and write them to the disk as necessary. This is made possible as follows:
- Each Page type is given a typecode in the Object Registry. A PageFactory implementation is registered for each Page typecode.
- The typecode is stored in the first two bytes (as a short integer) of the Page when the page is persisted. When reading a page, the first two bytes are inspected to determine the correct Page type to instantiate. Reading and writing various page types is managed by the PageFactory implementation.
- The PageManager looks up the PageFactory implementation in the ObjectRegistry, whenever it needs to persist or read pages.
- The Buffer Manager uses the PageManager to generate new instances of Pages or to read/write specific pages.
- The abstract Page class provides a common interface for all Pages. This interface implements all the functionality that is required by the Transaction Manager module to manage updates to pages.
Page Factory
Creating a page factory is relatively simple:
static class MyPageFactory implements PageFactory {

  final PageManager pageManager;

  public MyPageFactory(PageManager pageManager) {
    this.pageManager = pageManager;
  }
  public Page getInstance(int type, PageId pageId) {
    return new MyPage(pageManager, type, pageId);
  }
  public Page getInstance(PageId pageId, ByteBuffer bb) {
    return new MyPage(pageManager, pageId, bb);
  }
  public int getPageType() {
    return TYPE_MYPAGE;
  }
}
Note that the PageFactory implementation passes on the PageManager reference to new pages.
The PageFactory provide two methods for creating new instances of Pages. The first method creates an empty Page. The second creates a Page instance by reading the contents of a ByteBuffer - this method is used when pages are read from a StorageContainer.
The PageFactory implementation must be registered with the ObjectRegistry as a Singleton:
static final short TYPE_MYPAGE = 25000;
ObjectRegistry objectRegistry = ...;
objectRegistry.registerSingleton(TYPE_MYPAGE, new MyPage.MyPageFactory(pageFactory));
Page Manager
Following snippet of code shows how the PageManager instance is created:
Properties properties = new Properties();
properties.setProperty("storage.basePath", "testdata/TestPage");
properties.setProperty("logging.properties.file", "classpath:simpledbm.logging.properties");
properties.setProperty("logging.properties.type", "log4j");
platform = new PlatformImpl(properties);
storageFactory = new FileStorageContainerFactory(platform,
  properties);
objectRegistry = new ObjectRegistryImpl(platform, properties);
storageManager = new StorageManagerImpl(platform, properties);
latchFactory = new LatchFactoryImpl(platform, properties);
pageManager = new PageManagerImpl(
  platform,
  objectRegistry,
  storageManager,
  latchFactory,
  properties);
Note that the PageManager requires access to the ObjectRegistry, the LatchManager and the StorageManager. PageFactory instances are retrieved indirectly via the ObjectRegistry.
Storing and retrieving Pages
Before pages can be stored or retrieved, the appropriate Storage Containers must be created/opened and registered with the Storage Manager. Also, the Page types must be registered with the Object Registry. Following sample code shows how this may be done:
String name = "testfile.dat";
// Create a new storage container called testfile.dat
StorageContainer sc = storageFactory.create(name);
// Assign it a container ID of 1
storageManager.register(1, sc);
// Register the Page Type
objectFactory.register("mypage", TYPE_MYPAGE, MyPage.class.getName());
// Create a new instance of the page
MyPage page = (MyPage) pageFactory.getInstance("mypage", new PageId(1,
    0));
// Store the page in the container
pageFactory.store(page);
// Retrieve the page from the container
page = (MyPage) pageFactory.retrieve(new PageId(1, 0));
Buffer Manager
Overview
The Buffer Manager is a critical component of any DBMS. Its primary job is to cache disk pages in memory. Typically, a Buffer Manager has a fixed size Buffer Pool, implemented as an array of in-memory disk pages. The contents of the Buffer Pool change over time, as pages are read in, and written out. One of the principle tasks of the Buffer Manager is to decide which page should stay in memory, and which should not. The aim is to try to keep the most frequently required pages in memory. The efficiency of the Buffer Manager can be measured by its cache hit-rate, which is the ratio of pages found in the cache, to pages accessed by the system.
In order to decide which pages to maintain in memory, the Buffer Manager typically implements some form of Least Recently Used (LRU) algorithm. In the simplest form, this is simply a linked list of all cached pages, the head of the list representing the least recently used page, and the tail the most recently used. This is based on the assumption that if a page was accessed recently, then it is likely to be accessed again soon. Since every time a page is accessed, it is moved to the MRU end of the list, therefore over time, the most frequently accessed pages tend to accumulate on the MRU side. Of course, if a client reads a large number of temporary pages, then this scheme can be upset. To avoid this, the Buffer Manager may support hints, so that a client can provide more information to the Buffer Manager, which can then use this information to improve the page replacement algorithm. An example of such a hint would be to flag temporary pages. The Buffer Manager can then use this knowledge to decide that instead of the page going to MRU end, it goes to the LRU end.
Interactions with other modules
The Buffer Manager interacts with the Log Manager and the Page Manager modules. It needs the help of the PageFactory in order to instantiate new pages, read pages from disk, and write out dirty pages to disk. In order to support the Write Ahead Log protocol, the Buffer Manager must ensure that all logs related to the page in question are flushed prior to the page being persisted to disk.
The Transaction Manager also interacts with the Buffer Manager. During checkpoints, the Transaction Manager asks for a list of dirty pages. It uses information maintained by the Buffer Manager to determine where recovery should start. After a system restart the Transaction Manager informs the Buffer Manager about the recovery status of disk pages.
Operations
Creating a Buffer Manager instance
A Buffer Manager instance has a dependency on Log Manager and Page Factory. These in turn depend upon a few other modules. The following sample code illustrates the steps required to create a Buffer Manager instance.
LogFactory factory = new LogFactoryImpl();
Properties properties = new Properties();
properties.setProperty("log.ctl.1", "ctl.a");
properties.setProperty("log.ctl.2", "ctl.b");

// Create Storage Factory instance
StorageContainerFactory storageFactory =
    new FileStorageContainerFactory();
// Open Log
LogMgr log = factory.openLog(storageFactory, properties);
// Create Object Registry
ObjectFactory objectFactory = new ObjectFactoryImpl();
// Create Storage Manager instance
StorageManager storageManager = new StorageManagerImpl();
// Create Latch Factory
LatchFactory latchFactory = new LatchFactoryImpl();
// Create Page Factory
PageFactory pageFactory = new PageFactoryImpl(objectFactory,
    storageManager, latchFactory);
// Create a Buffer Manager intance with a Buffer Pool of
// 50 pages and a hash table of 101 buckets
BufMgrImpl bufmgr = new BufMgrImpl(logmgr, pageFactory, 50, 101);
Note that when creating a Buffer Manager instance, you can set the size of the Buffer Pool and also the size of the Hash table.
A Buffer Manager instance has a one to one relationship with a Page Factory. Hence all pages managed by the Buffer Manager instance will be of the same size; the page size is determined by the Page Factory.
Fixing Pages in the Buffer Pool
The Buffer Manager provides methods for fixing pages in the Buffer Pool. There are two possibilities:
- Fix a new page.
- Fix an existing page.
It is the client’s responsibility to know whether the page is new or existing. If a request is made to fix the page as new, then the outcome may be unexpected. If the page already exists in the Buffer Pool, it will be returned, rather than initializing a new Page.
When fixing a Page, the Page can be locked in one of three modes:
- Shared mode
- allowing multiple clients to access the same Page concurrently for reading.
- Update mode
- which allows one client to access the page in update mode, but other clients may access the same page concurrently in Shared mode.
- Exclusive mode
- in this mode only one client has access to the Page. This mode is used when a client wishes to modify the contents of the Page.
An Update mode request can be upgraded to Exclusive mode. An Exclusive mode request may be downgraded to an Update mode request.
Following code sample shows how page is fixed:
// Fix page as New (the second parameter). The page type is mypage.
// This page type should have been registered with the Object Registry
// prior to this call. The page will be latched in Exclusive mode.
// The last parameter is a hint for the LRU replacement algorithm.
BufferAccessBlock bab = bufmgr.fixExclusive(new PageId(1, 0),
  true, "mypage", 0);
As shown above, when a page is fixed, the Buffer Manager returns a BufferAccessBlock which contains a reference to the desired page. The Page can be accessed as follows:
MyPage page = (MyPage) bab.getPage();
Modifying page contents
Note that in order to modify a Page’s content, the Page must be fixed in Exclusive mode.
Also, the Write Ahead Log protocol must be obeyed. This requires the modification to proceed as follows:
- Fix the page in exclusive mode.
- Generate a log record containing redo/undo information for the modification about to be made.
- Modify the page contents.
- Set the Page LSN of the page and mark the page as dirty.
- Unfix the page.
Failure to follow this protocol may lead to unrecoverable changes.
Changing lock modes
As mentioned before, pages that are locked in Update mode may be upgraded to Exclusive mode. Pages that are locked in Exclusive mode may be downgraded to Update mode. The BufferAccessBlock interface provides methods that allow the lock mode to be upgraded or downgraded.
Unfixing a Page
It is very important to unfix a Page after the client is done with it. Failure to do so may cause the Buffer Pool to become full and the system will potentially come to a halt if further pages cannot be fixed. A fixed page cannot be removed from the Buffer Pool.
It is also advisable to keep pages fixed for a short duration only. If necessary the same page can be fixed again.
Transaction Manager
Introduction
The Transaction Manager is responsible for managing transactions. It provides interfaces for starting new transactions, and for committing or aborting transactions. The SimpleDBM implementation also supports Savepoints. While the view seen by the user is simple, the Transaction Manager is a complex module and has an elaborate interface. This chapter will attempt to unravel the TM interface and with the help of examples, demonstrate how this interface works and how other modules can use this interface to participate in Transactions.
Overiew
SimpleDBM‘s transaction manager is modelled after [ARIES]. It makes following assumptions about the rest of the system:
- The system uses the Write Ahead Log protocol when making changes to database containers.
- The unit of change is a disk page. This means that logging is on a per page basis.
- The disk page contains a PageLSN field that can be used to track the last log record that made changes to the page.
- During checkpoints the Transaction Manager does not flush all
pages, instead it writes the Buffer Manager’s “table of contents”
to the Log. The table of contents is the list of dirty pages in
the Buffer Pool, along with their Recovery LSNs. The Recovery
LSN is the LSN of the oldest log record that could potentially
have have a change to the page. For a discussion of the Recovery
LSN please refer to Mohan’s paper on ARIES and also to section
13.4.4.1 of [JGRAY]. [JGRAY] refers to Recovery LSNs as
forminlsn. - At the end of system restart, the Transaction Manager informs the Buffer Manager the RecoveryLSN status of all dirty pages; the Buffer Manager must therefore provide an interface for updating the Recovery LSN of such pages.
- The Log Manager provides a mechanism for reliably recording the Checkpoint LSN. Also, the Log Manager supports accessing Log Records sequentially from a starting point, as well as randomly using the LSN.
- The Lock Manager provides an interface for acquiring and release locks. The release mode must support a mechanism for forcing the release of a lock.
What is ARIES?
ARIES is a Transaction Logging and Recovery algorithm developed at IBM and published by IBM researcher C. Mohan.
For a full description of ARIES, please see Mohan, C.,
Haderle, D., Lindsay, B., Pirahesh, H., Schwarz, P. ARIES: A
Transaction Recovery Method Supporting Fine-Granularity Locking and
Partial Rollbacks Using Write-Ahead Logging, ACM Transactions on
Database Systems, Vol. 17, No. 1, March 1992, pp94-162.
A brief overview of ARIES is given below.
ARIES - An Overview
Following is a brief description of the main principles behind ARIES.
Firstly, in ARIES, changes always take the system forward. That is to say, even transaction rollbacks are treated as if they are updates to the system. This is counter-inituitive to what the user thinks, because when a user asks for a transaction to be rolled back, they assume that the system is going back to a previous state of affairs. However, from the perspective of ARIES, there is no such thing as going back. For example, if a transaction changes A to B and then rolls back, ARIES treats the rollback as simply an update that changes B to A. The forward change from A to B (redo) and the reversal of B to A (undo) are both recorded as updates to the system. Changes during normal operations are recorded as Redo-Undo log records. As the name implies, these log records can be ‘redone’ in case of a system crash, or ‘undone’ in case a rollback is required. Changes made during rollbacks, however, are recorded as Redo-only log records. These log records are called Compensation Log Records (CLRs). The reason these are redo only is that by definition a rollback does not need to be undone, whereas normal updates need to be undone if the transaction decides to rollback.
The second basic principle of ARIES is that during recovery, history is repeated. This can be explained as follows.
When a system crashes, there would be some transactions that have completed (committed or aborted), and others that are still active. The WAL protocol ensures that changes made by completed transactions have been recorded in the Log. Changes made by incomplete transactions may also be present in the Log, because Log Records are created in the same order as the changes are made by the system.
During recovery, ARIES initially replays the Log to the bring the system back to a state close to that when the crash occurred. This means that ARIES replays the effects of not only those transactions that committed or aborted, but also those that were active at the time of the crash. Having brought the system to this state, ARIES then identifies transactions that were incomplete, and rolls them back. The basic idea is to repeat the entire history upto the point of crash, and then undo failed transactions.
This approach has the advantage that during the redo phase, changes can be replayed at a fairly low level, for example, the level of a disk page. ARIES calls this page oriented redo. This feature is significant because it means that until the redo phase is over, the system does not need to know about higher level data structures such as Indexes. Only during the undo phase, when incomplete transactions are being rolled back, does the system need to know about high level data structures.
Features of ARIES
ARIES includes a number of optimisations to reduce the amount of work required during normal operations and recovery.
One optimisation is to avoid application of log records unnecessarily. The LSN of the most recently generated log record is stored in each disk page. This is known as the PageLsn. The PageLsn allows ARIES to determine during the redo phase, whether the changes represented by a log record have been applied to the page or not.
ARIES chains log records for transactions in such a way that those records that are no longer necessary, are skipped during recovery. For example, if a transaction changed A to B, and then rolled back, generating a log record for changing B to A, then during recovery, ARIES would automatically skip the log record that represents the change from A to B. This is made possible by maintaining a UndoLsn pointer in every Log Record. The UndoLsn normally points to the previous log record generated by the transaction. However, in log records generated during Rollback (known as Compensation Log Records), the UndoLsn is made to point to the Log record preceding the one that is being undone. To take an example, let us assume that a transaction generated log record 1, containing change from A to B, then log record 2 containing change from B to C. At this point the transaction decides to rollback the change from B to C. It therefore generates a new log record 3, containing a change from C to B. The UndoLsn of this log record is made to point at log record 1, instead of log record 2. When following the UndoLsn chain, ARIES would skip log record 2.
ARIES also supports efficient checkpoints. During a checkpoint, it is not necessary to flush all database pages to disk. Instead ARIES records a list of dirty buffer pages along with their RecoveryLsn(s). The RecoveryLsn of a page is the LSN of the earliest log record that represents a change to the page since it was read from disk. By using this list, ARIES is able to determine during recovery, where to start replaying the Log.
ARIES supports nested top-level action concept whereby part of a transaction can be committed even if the transaction aborts. This is useful for situations where a structural change should not be undone even if the transaction aborts. Nested top level actions are implemented using Dummy Compensation Log Records - and make use of the ability to skip logs records using the UndoLsn pointer as described previously.
Key differences from ARIES
The implementation of the Transaction Manager in SimpleDBM is as faithful to ARIES as possible, with a few differences.
- SimpleDBM supports multi-page redo operations where a single log record affects multiple pages.
- SimpleDBM records in the checkpoint records the list of open containers so that it can ensure that these containers are re-opened at startup.
- The transaction manager supports post commit actions for handling of special cases such as deleting a container.
- The transaction manager supports non-page specific log records for operations such as opening/deleting containers.
Transactions and Locks
There is close coordination between the Transaction Manager and the Lock Manager. A Transaction needs to keep track of all locks acquired on its behalf so that it can release them when the Transaction completes. This is why the Transaction interface in SimpleDBM provides methods for acquiring locks. If the Lock Manager is invoked directly by the client then the TM has no way of knowing which locks to release when the Transaction terminates.
While locks can be acquired by a client any time after a Transaction starts, locks are released only on one of the following three occasions:
- If the CURSOR STABILITY Isolation Mode is being used, then a SHARED or UPDATE lock can be released once the cursor moves to the next record. If REPEATABLE READ Isolation Mode is used, then the UPDATE lock can be downgraded to SHARED lock when the cursor moves. Note that the Transaction Manager does not decide when to release or downgrade a lock; it is the responsibility of the client to decide that. However, the Transaction must update its record of the locks when this happens. Therefore, lock release or downgrade requests must be handled via the Transaction interface and not directly between the client and the Lock Manager.
- When a Transaction is rolled back to a Savepoint, any locks acquired after the Savepoint are released. Note that if a lock was acquired before the Savepoint, and upgraded after the Savepoint, it will not be downgraded or released. The Transaction interface manages the release of such locks.
- Finally, when the Transaction completes, all locks held by the transaction are released.
Following sample code shows how a client interacts with the Transaction.
// Start new Transaction
Transaction trx = trxmgr.begin();

// Acquire a shared lock
trx.acquireLock(new ObjectLock(1,15), LockMode.SHARED,
   LockDuration.MANUAL_DURATION);

// Upgrade the shared lock
trx.acquireLock(new ObjectLock(1,15), LockMode.UPDATE,
LockDuration.MANUAL_DURATION);

// Downgrade the update lock
trx.downgradeLock(new ObjectLock(1, 15),
   LockMode.SHARED);

// commit the transaction, releasing all locks
trx.commit();
Transactions and Modules
The Transaction Manager provides a framework for managing transactions. It provides interfaces to:
- Start and end transactions
- Acquire locks on behalf of transactions
- Create log records on behalf of transactions.
The Transaction Manager itself does not initiate changes to database pages, though it may coordinate the redo or undo of such changes – changes are always initiated by clients. A client in this context is some module within the system that wishes to make changes to the database disk pages as part of a Transaction.
The Transaction Manager does not know in advance what clients it may have to interact with. However, it needs to be able to call upon the clients to redo or undo the effects of log records when required. This is enabled in two ways:
- Firstly, all clients must implement the TransactionalModule interface. This interface defines the operations that the Transaction Manager may call upon the client to perform.
- Secondly, all modules must register themselves to the Transaction Manager using unique Module IDs. This way, the Transaction Manager knows how to obtain access to a module, and ask it to perform an action.
- Finally, all log records generated by a Module need to be tagged with the Module’s Unique ID. If this is not done, the Transaction Manager would not know which module is responsible for handling a particular log record.
Transactions and Log records
The Transaction Manager works very closely with the Log Manager to ensure the ACID properties of transactions. We saw in the chapter on Log Manager that it does not care about the contents of Log Records. The Transaction Manager, however, does care, and defines a hierarchy of different Log record types that should be used by clients. This is explained below.
The Loggable hierarchy
Loggable is parent interface for all Log Records. The Transaction Manager will only accept Log records that implement this interface. This can be seen from the signature of the logInsert() method provided by the Transaction interface.
The Loggable hierarchy defines the various types of log records that clients can generate. These are further discussed below.
Loggable Hierarchy
The main branches of the Loggable hierarchy are shown below. Note that some of the hierarchy is not visible to outside clients (marked as internal).
| Interface | Description |
|---|---|
| Redoable | All log operations that affect database pages must implement this interface or one of its sub-interfaces. The Transaction Manager expects a valid PageId (s) to be returned by a Redoable log record. Note that Compensation and Undoable log records are sub-interfaces of Redoable. |
| NonTransactionRelatedOperation | These represent changes that are not related to specific pages. Since the ARIES algorithm uses page LSNs to track updates caused by log records, changes made by this type of log record are not tracked they are repeated unconditionally at system start. At present, this type of log operation is used to handle opening of containers. |
| PostCommitAction | Although PostCommitAction is a subinterface of NonTransactionRelatedOperation at present, this may change in future. PostCommitActions are used to schedule actions that must be performed after a successful commit. An example of such an action is the dropping of a container. To avoid logging the full contents of the container, the actual delete of the container must be deferred until it is certain that the Transaction is committing. Note that unlike other NonTransactionRelatedOperations, the Transaction Manager does track the status of PostCommitActions and will execute them at restart if they have not been executed. |
| ContainerDeleteOperation | The Transaction Manager needs to be aware when containers are deleted, both when a container is dropped or when the creation of a container is aborted. In both cases, the TM uses this marker interface to identify the delete operation and coordinates with the Buffer Manager to clear the cached pages related to the deleted container. |
| ContainerOpenOperation | The Transaction Manager needs to be aware when containers are opened between checkpoints so that it can include these in the next checkpoint. The TM uses this marker interface to identify the open operation. |
Transaction Manager Internal Log Records
The Transaction Manager uses internal log records to track Transaction completion, and also Checkpoints. These log record types are not available outside the implementation of the TM.
Redoable
Generally speaking, most log records are implementations of Redoable interface or one of its sub-interfaces. A Redoable log record is related to one or more database pages, and can be re-done at System restart. In some cases, the effects of a log record should not be undone; such records are called Redo-only log records and can be created in a number of ways:
- Implement the Redoable interface but not its Undoable sub-interface.
- Implement the Compensation interface. This is a special case, which is discussed later.
An example of a Redo-only log record is the Page Format operation. Newly created pages need to be formatted, but once this is done, it is unnecessary to undo the formatting.
Given below is an example implementation of a Page Format log record:
public static class FormatRawPage extends BaseLoggable
  implements Redoable, PageFormatOperation {

  ByteString dataPageType;

  public void init() {
  }

  public final String getDataPageType() {
      return dataPageType.toString();
  }

  public final void setDataPageType(String dataPageType) {
      this.dataPageType = new ByteString(dataPageType);
  }

  public int getStoredLength() {
      return super.getStoredLength() +
          dataPageType.getStoredLength();
  }

  public void retrieve(ByteBuffer bb) {
      super.retrieve(bb);
      dataPageType = new ByteString();
      dataPageType.retrieve(bb);
  }

  public void store(ByteBuffer bb) {
      super.store(bb);
      dataPageType.store(bb);
  }
}
As astute reader will notice that the Page Format operation extends the BaseLoggable class and implements both Redoable and PageFormatOperation interfaces. The BaseLoggable class and the PageFormatOperation interface are described further below.
BaseLoggable abstract class
The Transaction Manager provides the BaseLoggable abstract class which implements the Loggable interface. Rather than attempting to implement the Loggable interface from scratch, it is highly recommended that clients sub-class the BaseLoggable class and extend it to add functionality. The reason for making Loggable an interface and not an abstract class like BaseLoggable is that it allows the client to implement its own class hierarchy independently from the Loggable hierarchy.
PageFormatOperation
Operations that format new pages are particularly important because the Transaction Manager must invoke the Buffer Manager FIX AS NEW interface to fix pages affected by them. If the normal fix interface is called, an exception will be thrown because the page may not exist on disk or may be garbage. To allow the Transaction Manager to spot page format operations, all log records that perform such actions should implement the PageFormatOperation interface. This is a marker interface only.
Usually, PageFormatOperations are redo-only.
In SimpleDBM, the page format operations are handled when a container is created or expanded.
MultiPageRedo
Normally a Redoable log record represents changes to a single page. Sometimes, however, it may be necessary for a single log record to contain changes made to multiple pages. In such cases, the Log record should implement the MultiPageRedo interface.
Note that clients need to follow the following procedure when creating MultiPageRedo log records.
- Fix all the affected pages.
- Generate the MultiPageRedo log record.
- Apply changes to the affected pages.
- Set the pageLsn of all affected pages to the LSN of the log record.
- Unfix all affected pages.
Undoable
Logs records that need to be undoable should implement the Undoable interface. The Undoable interface extends the Redoable interface, thus, undoable log records are by definition redoable as well.
An Undoable log record should contain data that can be used to redo the changes, as well as to undo the changes. Typically, this means that both old and new values must be stored. For example, if the log is to represent changing a field value from A to B, then its old value will be A, and new value will be B.
At system restart, Undoable records are redone. This means that the redo portion of such log records are applied. In the example given above, this would cause the field value to be set to B.
When the Transaction Manager needs to undo the changes represented by an Undoable record, it will ask the client to perform one of following depending upon the type of Undoable record:
- If the Undoable record is an instance of SinglePageLogicalUndo, then the Transaction Manager assumes that the undo operation must be performed against some page other than the one originally affected. However, the undo is known to affect only one page. In this situation the Transaction Manager requests the client to identify the page to which undo should be applied, and then coordinates the generation of undo as normal.
- If the Undoable record is an instance of LogicalUndo, then the Transaction Manager assumes that the undo operation is not an exact inverse of the redo operation and may require updates to one or more pages. It also assumes that the client may generate additional log records. For such log records, the client is given full control over how the undo is to be performed.
- If neither of above are true, then the Transaction Manager assumes that the Undo operation is physical, i.e., it is to be applied to the same page that was affected by the original change. In this case, it requests the client to generate the undo information (Compensation) which is then applied as a redo operation.
Following sections describe above in reverse order.
Physical Undos
The simplest case is that of a Physical Undo, where the undo operation affects the same page that was originally modified during forward change (i.e., redo). In this case, the Transaction Manager asks the client to generate a Compensation record for redoing the undo operation. This is then applied to the affected page using the redo interface provided by the client. Following code shows how the Transaction Manager interacts with the client:
Compensation clr = module.generateCompensation(undoable);
....
module.redo(page, clr);
Thus, for this type of log record, the client must implement the generateCompensation(Undoable) and redo(Page, Redoable) operations.
SinglePageLogicalUndos
SinglePageLogicalUndos are slightly more complex than Physical undos. The undo operation is guaranteed to affect one page only, but it may not be the page originally affected. To handle this scenario, the Transaction Manager first asks the client to identify the page where the undo is to be applied. Once this has been done, the process is identical to that of Physical undos. Following code extract shows how the TM interacts with the client:
BufferAccessBlock bab = module.findAndFixPageForUndo(undoable);
...
Compensation clr = module.generateCompensation(undoable);
...
module.redo(bab.getPage(), clr);
...
bab.unfix();
What above shows is that the client is responsible for identifying and fixing the appropriate page – the page is unfixed by Transaction Manager once the change has been applied.
LogicalUndos
From the client’s perspective the most complex type of undo is where the undo operation may impact several pages, and may result in additional log records being generated.
For such records, the Transaction Manager simply invokes the client’s undo interface as follows:
module.undo(trx, undoable)
It is the client’s responsibility to generate appropriate log records and make changes to database pages.
Comments about implementing undo operations
From the discussion above, it should be clear that Physical undos are the easiest to implement. They are also the most efficient. However, in some cases, notably in Index operations, physical undos may not be optimum. This is because in a BTree Index, a key can move from one page to another as a result of page splits or page merges.
In some BTree implementations, such as in Apache Derby, the undo operations are limited to a single page. This is achieved through the use of logical key deletes.
Where keys are physically deleted, undo of key deletes may cause page splits. Such undo operations may impact more than one page. The SimpleDBM BTree implementation is an example of this type of operation.
Compensation records
Undo operations are represented using Compensation log records. The benefits of using Compensation log records are explained in detail by Mohan in the ARIES paper. As Mohan explains in his paper, a Compensation record is redo-only – it is never undone. A unique property of ARIES algorithm is that Compensation log records are linked back to the predecessor of the log record that is being undone. This backward chaining allows ARIES to skip processing of undo operations that are already applied.
While Compensation log records are mostly used to represent undo
operations, sometimes, they can be effectively used to represent
redo operations as well. The system can make use of the backward
chaining to allow certain log records to be skipped in the event of
an undo. This feature is the basis for the Nested Top Action concept
in ARIES. It is also exploited by the SimpleDBM BTree implementation
to reduce the amount of logging required for structure modification
operations. For further details, please refer to the paper entitled
– Space Management issues in B-Link trees.
PostCommitActions
PostCommitActions are used to defer certain actions until it is known for sure that the Transaction is definitely committing. In SimpleDBM, dropping a container is handled this way. When a request is made by a client to drop a container, a PostCommitAction is scheduled to occur once the transaction commits.
The Transaction Manager tracks the status of PostCommitActions and ensures that once a transaction has committed, its PostCommitActions are executed even if there is a system crash. This is achieved by logging such actions as part of the transaction’s Prepare log record. Note that a PostCommitAction may be executed more than once by the TransactionManager, hence it should be coded in such a way that there is no adverse impact if the operation is repeated. For example, if the action is to delete a container, it would be erroneous for the PostCommitAction to complain if the container is already deleted.
ContainerDeleteOperations
Since an ARIES style Transaction Manager operates at the level of disk pages, it is necessary to know when a container has been deleted so that all pages related to the container can be marked invalid. Also, the container needs to be closed to prevent further changes to it. The Transaction Manager uses the ContainerDeleteOperation interface as a marker interface to identify log records that are going to cause containers to be dropped.
ContainerOpenOperations
The TransactionManager maintains a list of open containers in the checkpoint record. At restart, it needs to identify containers created since the last checkpoint; it does this by tracking any ContainerOpenOperation records. A container is reopened if the ContainerOpenOperation is valid, i.e., it has not been superceded by a later ContainerDeleteOperation.
Space Manager
Introduction
The Space Manager module is responsible for managing free space information within a Storage Container. Using free space information, the Space Manager module can find pages that meet space requirements of clients. The Space Manager module also handles creation of new containers and expansion/deletion of existing containers.
Comparison with Storage Manager module
We have previously encountered the Storage Manager module which provides facilities for creating and dropping specific containers. However, these operations are low-level, and not transactional. Containers created by the Storage Manager module are raw, and do not have any structure.
The Space Manager module implements a higher level interface. It differs from the Storage Manager module in following ways:
- Its operations are transactional.
- Containers have a predefined structure and support fixed-size pages.
- The Space Manager module implements special pages within the container where information about other pages is maintained. This information can be used to quickly locate a page with specified amount of storage.
Operations
Obtaining an instance of SpaceMgr
The default implementation of the SpaceMgr module is org.simpledbm.rss.sm.impl.SpaceMgrImpl. As can be seen in the example below, the SpaceMgr module depends upon a number of other modules.
SpaceMgr spacemgr = new SpaceMgrImpl(objectFactory, pageFactory,
  logmgr, bufmgr, storageManager, storageFactory,
  loggableFactory, trxmgr, moduleRegistry);
Creating a Container
Following sample code demonstrates how to create a Container. Note that for correct operation, the container ID allocated to the new container should be locked exclusively prior to creating the container. This will prevent other transactions from manipulating the same container.
SpaceMgr spacemgr = new SpaceMgrImpl(...);
Transaction trx = trxmgr.begin();
boolean okay = false;
try {
  // Create a new Container named testctr.dat and assign it a container
  // ID of 1. This container will use RawPages as its data page.

  int containerId = 1;
  int spaceBits = 1;
  int extentSize = 64;
  spacemgr.createContainer(trx, "testctr.dat", containerId,
     spaceBits, extentSize, pageFactory.getRawPageType());

  okay = true;
}
finally {
  if (okay) {
     trx.commit();
  }
  else {
     trx.abort();
  }
}
Note that the container create operation is transactional.
Extending a Container
When a container is initially created, it is allocated an extent of specified size. The extent is the minimum allocation unit for a container; a container is always expanded in extents.
Transaction trx = trxmgr.begin();
spacemgr.extendContainer(trx, 1);
trx.commit();
Deleting a container
Note that prior to deleting a container, you must acquire an Exclusive lock on the container ID. This will prevent other transactions from accessing the same container.
Deleting a container is as simple an operation as extending it:
Transaction trx = trxmgr.begin();
spacemgr.dropContainer(trx, 1);
trx.commit();
An important point to note about the container delete operation is that the physical removal of the container is deferred until the transaction commits. This is done to allow the delete operation to be rolled back in case the transaction aborts.
A limitation in the current implementation is that the container is not physically removed. This will be fixed in a future revision of the module.
Searching for free space
At the time of creating a container, you can specify the number of bits that should be used to track space information for each individual page. At present, you can either use a single bit or two bits. If one bit is used, the possible values are 0 and 1, if two bits are used, then the possible values are 0, 1,2 and 3. The SpaceMgr module initializes the space bits with a value of 0, hence this value always means unused or unallocated space. The interpretation of other values is upto the client; SpaceMgr merely provides the mechanism to maintain this data.
As an example, in the BTree module, containers are created with a single bit for each page. The value 0 is used to identify unallocated pages, 1 is used for allocated pages.
In order to search for free space, you first need to obtain a SpaceCursor. The SpaceCursor mechanism allows you to perform following actions:
- Search for page with specified space usage, and fix associated space map page exclusively.
- Update the space map information for a page, and log this operation.
- Fix a specific space map page.
- Unfix the currently fixed space map page.
When you search for free space, you need to provide an implementation
of SpaceChecker; this will be invoked by SpaceMgr module to
check whether a page meets the space requirements of the client.
Here is an example of a search that attempts to locate pages that are unallocated:
int pageNumber = spaceCursor.
     findAndFixSpaceMapPageExclusively(new SpaceChecker() {
  public boolean hasSpace(int value) {
     return value == 0;
  }
});
If the SpaceCursor cannot locate a suitable page, it returns -1. Otherwise it returns the page that satisfied the space request.
An important point to note is that just because space map information indicates that the page has free space, does not always mean that the page will be able to satisfy the request. Some modules, such as the TupleMgr module, may mark pages as free even though they are still occupied. Please refer to the TupleMgr documentation to understand why this is so. In general, it is upto the client module to ensure that the space map information is accurate and up-to-date.
Usually, if the space map search returns -1, the container needs to be extended and then the search retried.
Updating space information
A successful search will result in the space map page being exclusively latched. Hence, after the search, the client must unfix the page. Failure to do so will cause pages to remain fixed and exhaust the Buffer Pool. The SpaceCursor interface provides an interface for unfixing the currently fixed space map page.
Transaction trx = trxmgr.begin();
spaceCursor.updateAndLogRedoOnly(trx, pageNumber, 1);
spaceCursor.unfixCurrentSpaceMapPage();
trx.commit();
Above example also shows how to update the space map page information and also log it to the Write Ahead Log.
There will be times when the client wishes to update the space information for a specific page. In this situation it is the client’s responsibility to know which space map page contains the associated data.
The SpaceCursor interface supports accessing a specific space map page, provided it is known which page is desired:
Transaction trx = trxmgr.begin();
SpaceCursor spcursor = spaceMgr.getSpaceCursor(containerId);
spcursor.fixSpaceMapPageExclusively(spaceMapPageNumber,
  pageNumber);
try {
  pcursor.updateAndLogRedoOnly(trx, pageNumber, spacebits);
} finally {
  spcursor.unfixCurrentSpaceMapPage();
}
trx.commit();
Slotted Page Manager
Introduction
SimpleDBM, like most other databases, stores records in fixed size pages. The Slotted Page Manager module provides an enhancement to the Raw Page by allowing records to be inserted, updated and deleted within the page. By providing a common infrastructure, client modules such as the B-Tree Manager or the Tuple Manager can concentrate on higher level functions.
Structure of Slotted Page
From the client perspective, the structure of the Slotted Page is not relevant in its details. What matters is the interface. A key requirement is to be able to access records quickly within the page, using a numeric identifier called Slot Number.
Each record in the page is assigned a Slot Number. Slot Numbers start from 0, ie, the first record in the page can be accessed via Slot Number 0.
In addition to storing the record data, each Slot is also capable of storing a set of flags in a Short integer. The interpretation of these flags is up to the client module.
Records may be inserted at a specific Slot position, updated and deleted. Deleted records leave the Slot unoccupied, but do not shift records. A purge interface is available which completely removes the record specified and also shifts to the left all records to the right of the purged record.
Obtaining instances of Slotted Page
The actual implementation of the Slotted Page is not visible to the outside world. The Slotted Page Manager module registers the implementation of SlottedPage to the Object Registry. This enables client modules to obtain new instances of SlottedPage without having to know how this is implemented. Following snippet of code illustrates this:
SlottedPageMgr spmgr = new SlottedPageMgrImpl(objectFactory);
SlottedPage page = (SlottedPage)
  pageFactory.getInstance(spmgr.getPageType(), new PageId());
Note that the PageFactory is able to instantiate the appropriate
Page type using the typecode (spmgr.getPageType()) assigned
to the implementation by the SlottedPageManager module.
In most cases, clients do not actually invoke the PageFactory as shown above. Instead it is more common to specify the page type when a container is first created; this ensures that the Buffer Manager module can instantiate the correct page type automatically. Here is an example of how to do this:
// Create the container and specify SlottedPage as the page
// type.
spaceMgr.createContainer(trx, name, containerId, spacebits,
  extentSize, spmgr.getPageType());

// Fix page 5
BufferAccessBlock bab =
  bufmgr.fixExclusive(new PageId(containerId, 5), false, -1, 0);

// Get access to the page.
SlottedPage page = (SlottedPage) bab.getPage();
In the example above, the Space Manager module formats all data pages in the specified container as SlottedPage. This ensures that when the client module accesses the page via the Buffer Manager, the correct page type is automatically instantiated.
Inserting or updating records
The SlottedPage interface supports two insert modes. In the replace mode, the new record will replace any existing record at the same Slot. If replace mode is false, the new record will cause existing records to be shifted to the right to make space for the new record.
boolean replaceMode = false;
// Insert item1 at Slot 0
page.insertAt(0, item1, replaceMode);
// Insert item0 at Slot 0
page.insertAt(0, item0, replaceMode);
// Now item1 is at Slot 1
When invoking SlottedPage.insertAt(), the SlotNumber must be
between 0 and SlottedPage.getNumberOfSlots().
Deleting records
As mentioned before, there are two types of delete. The first type removes the record but does not disturb the Slot Numbers. Example:
// Insert at slot 0
page.insertAt(0, item0, true);
// Insert at slot 1
page.insertAt(1, item1, true);
// Delete slot 0
page.delete(0)
// Slot 1 still holds item1
The second mode is called purge, and in this mode, records to the right of the deleted Slot are moved left to fill up the hole. Example:
// Insert at slot 0
page.insertAt(0, item0, true);
// Insert at slot 1
page.insertAt(1, item1, true);
// Delete slot 0
page.purge(0)
// Slot 0 now holds item1
Accessing records
The SlottedPage.getNumberOfSlots() method returns the number
of slots in the page. To access a slot, you invoke SlottedPage.get();
you must supply the correct Storable object
type as the second parameter.
// Get the record at Slot 1 as a StringItem.
page.get(1, new StringItem());
Miscellaneous operations
It is possible to assign to each Slot a set of flags. Upto 16 bits can be accomodated.
// Get the flags for Slot 0
int flags = page.getFlags(0);
// Update the flags for Slot 0
page.setFlags(0, (short)(flags | 1));
The total number of Slots in the page is returned by
the method getNumberOfSlots(). To test whether a particular Slot is deleted, you can use
the method isSlotDeleted().
There are a few methods that provide space usage data.
Index Manager
Overview
The Index Manager module is responsible for implementing search structures such as BTrees. Indexes are used to enforce primary key constraint and unique constraints in tables, as well as for ensuring speedy retrieval of data.
Challenges with B-Tree Concurrency
It is challenging to implement a B-Tree that supports high concurrency and is also recoverable. The problem occurs because B-Tree traversals occur top-down, whereas the tree grows bottom-up using page splits that are propagated up the tree.
In the following discussion, the term SMO is used to refer to modifications to a B-Tree that causes the Tree’s structure to change. By structure we mean the relationships that exist between the nodes in the tree, such as parent- child and sibling relationships.
The key ideas that enable concurrent updates to B-Trees are:
- Short term locks must be used to prevent interactions between concurrent updaters and traversers to ensure that each process gets a structurally consistent (but not necessarily the same) view of the B-Tree. A considerable amount of research has been devoted to ways of reducing the scope of locking to increase concurrency. Worst case is that the entire Tree must be exclusively locked during an SMO.
- In B+Tree trees (a variation of B-Tree), all keys are maintained in the leaf pages and the index nodes act as navigation aids. In such trees, completed structural changes to the B-Tree need not be undone even when transactions that initiated them roll back. Only incomplete structural changes must be undone because they will corrupt the B-Tree.
- Although structural updates occur bottom up, locking must always be top-down. Maximum concurrency is obtained when structural changes can be propagated bottom-up without obtaining locks at multiple levels of the tree.
Survey of algorithms
A popular approach to improving concurrency is based on locking subsets of the Tree top-down during an SMO. For example, if it becomes necessary to split a page, the program gives up any locks on the page to be split, and traverses down the tree from root, obtaining exclusive locks on nodes while moving down the tree. If a node is encountered which is “safe”, i.e., has sufficient space for accomodating a split key, then locks on higher level nodes may be released. This process continues until the leaf node is found that is to be split. In the worst case scenario the entire path from the root node to the leaf node will be locked exclusively. Having obtained all the locks, the inserter can proceed splitting the leaf node and propagating the change up the tree.
An undesirable feature of this method is that locks are obtained at multiple levels of the tree, which is bad for concurrency.
ARIES/IM [MOHA-92] algorithm tries to avoid locking pages at more than one level simultaneously. SMOs are performed bottom-up rather than top-down for maximum concurrency, but a Tree Lock is used to serialize SMO operations. This means that only one SMO operation can be active at any point in time, but operations that do not cause SMOs, can proceed concurrently. The ARIES/IM algorithm supports key deletions and node consolidations.
Several other approaches to the problem of concurrency in B-Trees are based on the seminal work done by Lehman and Yao in [LEHMAN-81]. The B-Link tree structure described by Lehman and Yao has following features:
- Nodes are linked to each other from left to right at each level of the Tree.
- Each key in an index node has an associated child pointer which points to a subtree containing keys that are guaranteed to be less or equal to the key value.
- Leaf nodes have an extra key that is known as the high key - all keys in the leaf node are guaranteed to be less or equal to the high key.
- The algorithm does not support consolidation or deletion of nodes. Once created, the nodes continue to exist. Key deletes are handled by simply removing keys from the leaf nodes - hence the need for a high key as an upper-bound for the key-range within a leaf node. Leaf nodes are allowed to become empty (except for the high key which can never be deleted).
- Page splits always result in a new sibling to be created on the right.
- Page splits always update the sibling pointer first, before updating the parent node. The page split and the sibling pointer update is handled as an atomic action to ensure that no two processes can ever see the Tree in a state where two adjacent nodes are not linked in this way.
The main idea is that while an a page split is in progress, there is a short time window during which the parent lacks a pointer to the newly allocated child node. During this time window, the newly allocated node can be reached via the sibling node to its left.
During navigation, if the search key exceeds the highest value in the node, it indicates that the tree structure has changed, and the traversal must move right to the sibling node to find the search key.
The concurrency of a B-link Tree is improved because in the worst case only three nodes need to be locked during a page split, and page splits are propagated bottom-up rather than top-down.
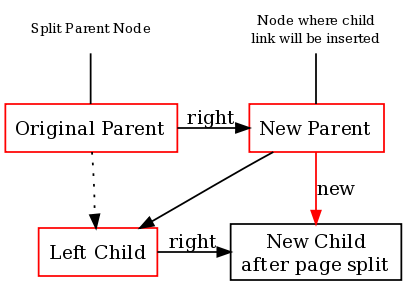
The diagram above shows the worst case locking, when original parent node, its new sibling, and the left child are all locked before the new link to the right sibling is inserted.
Limitations of Lehman and Yao B-link Trees
Lehman and Yao assumed that each process that accesses a node would read its own copy of the page. In most DBMS implementations, this is not true. Pages are shared between processes via the Buffer Manager. Therefore readers must lock pages in shared mode before accessing them.
Deletions do not support merging of nodes because when propagating a key split up the tree, the algorithm relies on always being able to move right from the current parent node to find the correct node where the child link and split key needs to be inserted.
Suggestion is to use offline process that locks the entire tree in order to compact the tree.
The algorithm does not consider recovery.
Recoverable B-Link Trees
The individual page split operations in a B-Link Tree can be made atomic by using the nested top action features of ARIES. These atomic actions must be independent of regular transactions and must not be undone even if the transaction that triggered them is aborted.
The difficult bit is to ensure that the parent nodes are properly updated even if there is a system crash, say between the split occuring at leaf level and it being propagated to the level above.
In [DAVI-92], the authors provide a solution to this problem. During tree traversals, it is possible to detect that a node lacks a pointer to it from the parent. When this is detected, an action can be initiated to add the missing link into the parent node.
B-Tree algorithm in Apache Derby
In Apache Derby, when an inserter finds during a page split that that it is unable to promote the discriminator key into the parent node because the parent node is full, it releases all locks, and starts a new traversal from the root, splitting all nodes that are too full to accomodate the discriminator key. This is done top-down, and may esult in moe page splits that needed, but the assumption is that the nodes would have to be split eventually anyway.
SimpleDBM B-link Tree
SimpleDBM currently provides a B-Link Tree Index implementation, based upon algorithms described in [JALUTA-05]. These algorithms combine the idea of short atomic actions, as in [DAVI-92], with top-down detection and correction of page overflow and underflow conditions. Unlike previous algorithms, these algorithms handle deletes uniformly as inserts, and automatically merge nodes as they become empty.
There are some variations from the published algorithms, noted at appropriate places within the code, and described below.
Structure of the B-link Tree
The tree is contained in a container of fixed size pages. The first page (pagenumber = 0) of the container is a header page. The second page (pagenumber = 1) is the first space map page. These pages are common to all containers that are managed by the Free Space Manager module.
The third page (pagenumber = 2) is allocated as the root page of the tree. The root page never changes.
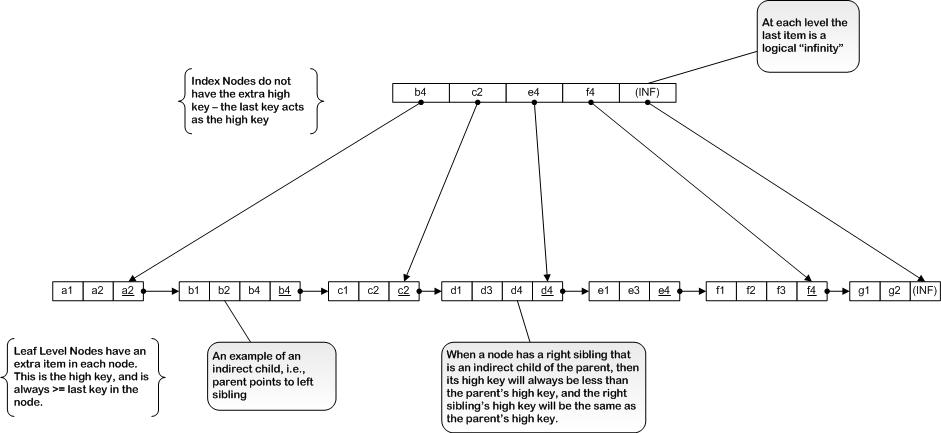
Pages at all levels are linked to their right siblings. In leaf pages, an extra item called the high key is present. In index pages, the last key acts as the highkey. All keys in a page are guaranteed to be <= than the highkey. Note that in leaf pages the highkey may not be the same as the last key in the page.
The reason for the extra high key in leaf pages is that the high key defines the key space contained within the leaf page, and does not change when the keys within the leaf page are deleted. The highest key in the leaf page cannot be used as the high key because the high key can only change through page split, redistribute or merge (SMO) activities, whereas the highest key may be deleted outside of these operations, for example, as part of a delete key operation.
In index pages, each key is associated with a pointer to a child page. The child page contains keys <= to the key in the index page.
A direct child can be accessed from the parent by following a child pointer. An indirect child is accessed via the direct child’s right sibling pointer.
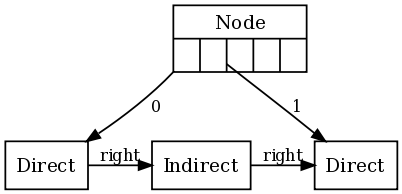
The highkey of the child page will match the index key if the child is a direct child. The highkey of the child page will be < than the index key if the child has a sibling that is an indirect child.
All pages other than root must have at least two items (excluding the highkey in leaf pages).
The root node is allowed to have a right sibling. Eventually, such a situation is resolved by increasing the tree’s height. See Increase Tree Height Operation for more information.
The rightmost key at any level is a special key containing logical INFINITY. Initially, the empty tree contains this key only. As the tree grows through splitting of pages, the INFINITY key is carried forward to the rightmost pages at each level of the tree. This key can never be deleted from the tree.
Structure of Nodes
Overview
Nodes at each level of the tree are linked from left to right. The link of the rightmost node at a particular level is always set to null.
Leaf Nodes
Leaf nodes have following structure:

[header] [item1] [item2] ... [itemN] [highkey]

item[0] = header
item[1,header.KeyCount-1] = keys
item[header.keyCount] = high key
The highkey in a leaf node is an extra item, and may or may not be the same as the last key [itemN] in the page. Operations that change the highkey in leaf pages are Split, Merge and Redistribute. All keys in the page are guaranteed to be <= highkey.
Index Nodes
Index nodes have following structure:
[header] [item1] [item2] ... [itemN]
item[0] = header
item[1,header.KeyCount] = keys
The last key is also the highkey. Note that the rightmost index page at any level has a special key as the highkey - this key has a value of INFINITY.
Each item in an index key contains a pointer to a child page. The child page contains keys that are <= than the item key.
Key Differences from published algorithm
Support for Non-Unique indexes
The published algorithm assumes a unique index. SimpleDBM implementation supports both unique and non-unique indexes. In non-unique indexes, a key/location pair is always the unit of comparison, whereas in unique indexes, only key values are used. There are some differences in how locking is handled for a unique index versus a non-unique index.
Handling of storage map
The published algorithm assumes a single page 0 that contains a bit vector showing the allocated/unallocated status of all pages. In SimpleDBM implementation space allocation is managed using free space pages which are arranged in a linked list and are dynamic.
There is an important concurrency improvement related to handling of the space map. See [DIBY-05] for further details.
Variable length keys
The implementation differs from the published algorithm in how it determines whether a page is “about to underflow” or “about to overflow”. It considers any page with minimum keys (1 for root, and 2 for all other pages) as about to underflow. It checks the available space for the key being inserted to determine whether the page is about to overflow.
Page Split operation
A page split operation takes a node and splits it into two. A new node is allocated and linked to the old node. This is shown in the example below.
Here’s an example of a leaf node. Note the presence of the extra high key.

When the node is split, the keys are divided between the old node and a newly allocated node. The old node’s right field is set to point to the newly allocated right sibling. Note that the high key changes in the old node and is set to be the same as the highest key in the node. This may later on change as keys are deleted from the node.

The splitting of an index node is similar, except that the extra high key is not present.
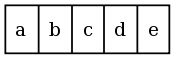
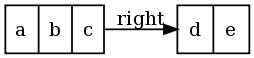
The Split Operation differs from the published algorithm in following ways:
- Page allocation is logged as redo-undo.
- Space map page latch is released prior to any other exclusive latch.
- The split is logged as Muli Page Compensation record, with undoNextLsn set to the LSN prior to the page allocation log record.
- Information about space map page is stored in new page.
- The total space occupied by keys as an indicator of key space. For example, when finding the median key, SimpleDBM sums up key lengths to decide where to split.
When implementing the Split operation it became necessary to enhance the transaction manager to support multi-page redo records - ie - one redo record containing data for multiple pages. The published ARIES algorithms do not cater for this.
The published algorithm does not state this requirement but assumes that the transaction manager supports multi-page redo.
Merge Operation
The Merge Operation is the opposite of the Split operation. It joins two existing nodes to create a single node.
The implementation differs from published algorithm in its management of space map update. In the interests of high concurrency, the space map page update is handled as a separate redo only action which is logged after the merge operation.
If this space map update log record does not survive a system crash, then the page will end up appearing allocated. However the actual page will be marked as deallocated, and hence can be reclaimed later on, although this is not implemented.
The Merge Operation is logged as a Multi-Page Redo only record.
Link Operation
The Link Operation creates a link from a parent node to a child node. Following diagrams illustrate the link operation.
Before the link operation:

After the link operation:
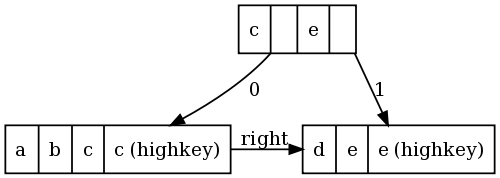
The implementation differs slightly from the published algorithm. The psuedo code for the implementation is shown below.
v = highkey of RightNode
u = highkey of LeftNode
Link(ParentNode, LeftNode, RightNode) {
  upgrade-latch(ParentNode);
  n = new index record (u, LeftNode.pageno);
  lsn = log(<unlink, ParentNode, n, LeftNode.pageno, RightNode.pageno>);
  find index record with child pointer = LeftNode.pageno in ParentNode;
  change the child pointer of above to RightNode.pageno;
  insert new index record n before above index record.
  ParentNode.pageLsn = lsn;
  downgrade-latch(ParentNode);
}
Unlink Operation
The Unlink Operation is the reverse of the Link operation.
The implementation differs slightly from the published algorithm. The psuedo code is shown below.
Unlink(ParentNode, LeftNode, RightNode) {
  upgrade-latch(P);
  lsn = log(<unlink, ParentNode, LeftNode.pageno, RightNode.pageno>);
  in ParentNode delete the index record with child pointer
     set to LeftNode.pageno;
  change the child pointer of next index record to LeftNode.pageno;
  ParentNode.pageLsn = lsn;
  unfix(ParentNode);
}
Redistribute Keys Operation
The implementation of this differs from the published algorithm. It moves one key from the overpopulated node to the sibling node, rather than evenly redistributing the keys across the two nodes.
For example, before the Redistribute Operation:
After the Redistribute Operation:

The Redistribute Key operation is logged using a Multi-Page redo only log record.
Increase Tree Height Operation
The Increase Tree Height Operation is used to raise the height of the tree. For this to occur, the root must have been split previously and therefore must have a right sibling.
During this operation, a new node is allocated and the contents of the rooot node copied to this new node. The root node is then re-initialized to contain pointers to the new node as its left child and the old right sibling as its right child.
For example, let us consider the following:

This is how it appears after the Increase Tree Height Operation:
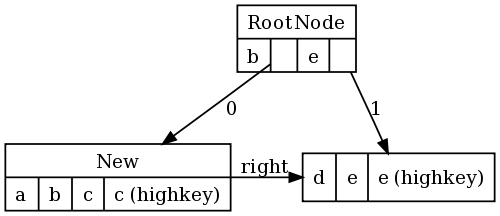
The implementation differs from the published algorithm in following ways:
- Page allocation is logged as redo-undo.
- Space map page latch is released prior to any other exclusive latch.
- The Increase Tree Height operatopn is logged as Muli Page Compensation record, with undoNextLsn set to the LSN prior to the page allocation log record.
- There is no need to format the new page as pages are formatted when they are first created.
Decrease Tree Height Operation
This differs from the published algorithm.
To increase concurrency, the space map page update is logged after the SMO as a separate redo only action. This improves concurrency because the space map page latch is not held exclusively during the SMO. However, it has the disadvantage that if the SMO survives a system crash, and the log for the space map page updates does not survive, then the page will remain allocated on the space map, even though it is no longer in use. It is posible to identify deallocated pages by checking the page flags for the BTreeNode but this is not implemented.
The Decrease Tree Height Operation is logged as Multi Page Redo only log record.
Index Scans
The published algorithm only considers the SERIALIZATION lock isolation mode, but the implementation supports other lock modes. There are differences in when and where locks are acquired and released under various modes.
Simplified Algorithm for Scans
The published algorithm has a complex fetch and fetchnext logic, and attempts to handle both > and >= operators. The implementation does not allow the operator to be specified. It automatically uses >= for the first fetch, and then > than current key for subsequent fetches.
The code for next key locking code is simplified. We don’t do all the checks that are in the published algorithm. This means that there is a greater chance that the tree will be rescanned.
The published fetch algorithm does not cater for UPDATEABLE cursors. In general, the paper assumes that the B-Tree is standalone, and contains data records. In SimpleDBM, and in most DBMS implementations, a B-Tree index is a redundant structure - leaf pages contain pointers to data records. The published algorithms are not always the best fit for this. For example:
- The algorithm suggests locking current key and next key during Inserts and Deletes. In a DBMS, the current key is already locked when an Insert or Delete is issued.
- In a DBMS a fetch cursor is also used in UPDATE mode. For example, when a DELETE or UPDATE SQL statement is issued, the records must be fetched using UPDATE locks. Then the lock is upgraded to EXCLUSIVE, and the key is deleted. In this scenario, we need to cater for the fact that the current key may be deleted. Therefore, when the fetch next call is issued, the cursor must be able to detect that the key does not exist and rescan. These issues are discussed in detail in [MOHA-02].
SimpleDBM does not implement the optimizations described in [MOHA-02]. Therefore, supposing all keys are deleted during the index scan, after the first page, every delete will cause the tree to be scanned from root to leaf. This can be avoided by using the technique described by Mohan.
Simpler page modification checks
The implementation uses a simpler check to determine whether the page has changed since last it was latched. This may cause unnecessary traversals from root node.
B-Tree index is a secondary structure
Unlike the published algorithm, where the B-Tree index holds the database records in the leaf nodes, the implementation stores pointers (Locations) to tuples (table rows).
Tuple Manager
Overview of Tuple Manager
The Tuple Manager module provides a low-level interface for managing persistence of table rows. It is low-level in the sense that this module has no knowledge of what is contained in a table row. I use the term tuple instead of table row, but even this is not the right term, as a tuple means a collection of attributes.
To the Tuple Manager, tuples are just blobs of data that can span multiple pages. When a tuple is inserted for the first time, it is assigned a unique Location, which is really an abstraction of the ROWID concept in other databases. The Tuple Manager module implements the Location interface, but other modules do not need to know anything about the internal structure of these objects.
Like B-Tree indexes, tuples are stored in containers. A container that is specialized for storing tuples is called a Tuple Container. By design, only one type of tuple may be stored in a particular container. In a higher level module, a tuple can be mapped to a table row, and the container to a table.
The interface of Tuple Manager is made generic by ensuring that it knows very little about tuples. Unfortunately, this means that tuple updates cannot be handled efficiently, specially with regards to logging, as the contents of the both before and after images of the tuple must be logged. A possible optimisation would be to use some form of binary diff algorithm to generate a change vector, and store the change vector only in the log record. Another way is to allow a callback method to calculate the difference between the old and the new tuple.
Design Decisions
Some of the implementation decisions are given below:
Tuple Inserts
Tuple inserts are done in two stages. In the first stage, a new Location is allocated and locked exclusively. Also, the tuple data is inserted into the first page that will be used by the tuple. The rest of the tuple data is inserted in the second stage. The rationale for splitting the insert into two stages is to allow the client to perform other operations in between, such as creating Index keys.
Tuple Segmentation
If a tuple is too large to fit into one page, it is broken into
chunks of TupleManagerImpl.TupleSegment. Each segment is inserted
into a page, and the segments are linked together in a singly linked
list. Since the segments are inserted in order, in the first pass the links
are not set, and the implementation has to revisit all the pages and update
the links between the segments. The last segment/page does not require
an update.
At the time of insert, the implementation tries to allocate as much space as possible on each page. When a page is visited, an attempt is made to reclaim any deleted segments within the page.
Tuple Deletes
Deletes are logical, ie, the Tuple Segments are marked with a logical delete flag. Space Map information is updated immediately, however. During deletes, the links between the segments of a tuple are broken. This is because the link is reused to store the tuple’s Location. Thus, it is possible to determine the Location of a tuple from any of the deleted segments. This is important because the tuple reclamation logic uses locking to determine whether a logically deleted tuple can be physically removed.
If the delete is undone, the links are restored.
Tuple Updates
When tuples are updated, existing segments are updated with new data. If the
new tuple is longer than the old tuple, then additional segments are added.
The TupleInserter#completeInsert() interface is reused for this purpose.
No attempt is made to change the size of existing segments, even if there
is additional space available in the page. This is to keep the algorithm
simple. Also, segments are never released, even if the new tuple has
become smaller and does not occupy all the segments.
Note that due to the way this is implemented, more than one segment of the same tuple can end up in the same page.
Since the structure of the tuple is opaque to this module, updates are not very efficiently handled. Current implementation logs the full before and after images of the tuple being updated. In future, this needs to be made more efficient by using some mechanism to calculate the difference between the old tuple and the new.
Space Reclamation
Space used by deleted tuples is reclaimed when some other transaction visits the affected page and tries to use the space. Locking is used to determine whether the delete was committed. The actual physical removal of the tuple segments are logged. Note that this method of determining whether a segment can be released is conservative and sometimes results in segments being retained even when they are no longer required. Why this happens will become clear with an example. Suppose that a tuple that has 4 segments is deleted. Each segment is marked deleted. Now, some transaction creates a new tuple, reusing the Location of the deleted tuple. However, the new tuple may not reuse all the segments used by the old tuple, in fact, only the first segment is guaranteed to be reused. As a result of the tuple insert, the Location gets exclusively locked. If this transaction or any other transaction encounters the remaining segments that are marked deleted, the reclamation logic will incorrectly assume that the delete is still uncommitted, because the lock on the location will fail. The segments wil get eventually reused, when the transaction that locked the tuple commits.
Tuple Segment Structure
Each Tuple segment contains three fields.
- nextPageNumber
- Used only in segmented tuples. Normally, points to the location of next segment. If a tuple is deleted, this is updated to the page number of the first segment.
- nextSlotNumber
- Used only in segmented tuples. Normally, points to the location of next segment. If a tuple is deleted, this is updated to the slot number of the first segment.
- data
- Data in this segment.
Free Space Information
Both BTrees and Tuple Containers need free space management. By free space management we mean the process of identifying pages where new data can go. In the case of B-Trees, SimpleDBM uses space map pages that use one bit per page. This is okay, because in a BTree, a page is either allocated or not.
In case of Tuple Containers, I am using space map pages that use two bits to store the space information for a single page. This means that we can track the following states: full (3), two-thirds full (2), one-third full (1), and empty (0). Initially pages start out empty, but when they are used, their status changes as required.
There are a couple of issues related to space management that merit discussion. Unfortunately, there are very few papers that go into all the details. Couple of very useful papers are [MOHA-94] and [CAREY-96].
The first issue is how to handle deletes. There are two options.
The first option is to delete a tuple physically and update space map page to reflect the change. However, this poses the problem that if the transaction aborts and the tuple needs to be restored, then the restore will fail if some other transaction uses up the released space in the meantime. To prevent this, some extra information needs to be stored in the page to indicate that although the tuple has been deleted, its space is reserved, and cannot be used by any other transaction. One possible approach is to store the transaction id and the amount of space reserved using the space previously occupied by the tuple. If the tuple occupied more than one page, then space must be reserved on all affected pages, since otherwise, when the tuple is to be restored, the pages may no longer have space to hold the tuple data. If logical undo is implemented, then it is possible to avoid reserving space in pages other than the first page, because a logical undo will allow new pages to be commissioned if necessary to accomodate the restored tuple. Since the tuple’s unique id (Location) is bound to the first page, this page must always have space available for the tuple to be restored.
If as suggested above, the space map information is updated as soon as the tuple is deleted, then other transactions looking for free space may end up visiting the pages that have been affected by the tuple delete. However, those transactions may discover when they access the page, that space is not actually available. As a solution to this problem, the space map page update could be deferred until the tuple delete is known to have been committed. However, this would be inefficient, as the transaction that performs the delete will have to visit all pages affected by deleted tuples at commit time, and update the free space map information for these pages.
The space map update could also be delegated to the next transaction that needs the space. The problem with this is that if the page remains marked as fully allocated, then no other transaction will visit that page unless the tuples on the page need to be updated. There is the risk that the tuple space will never be reclaimed.
The problem of unnecessary visits to a page containing reserved space can be avoided by techniques described in [CAREY-96]. This involves maintaining a cache of recently used pages and avoiding scanning of the free space map as long as there is candidate page available in the cache. When a page is affected by a tuple delete, it is added to the cache provided that its total free space, including the space reserved for deleted tuple, is greater than the fullest page in the cache. If a transaction visits such a page and is unable to use the reserved space, it removes the page from the cache.
In summary then, the preferred option appears to be to update the space map information as soon as the tuple is deleted.
Physically deleting tuples affects the amount of logging that must be performed. Since the tuple’s data is removed, the log must contain the entire contents of the deleted tuple. Similarly, when undoing the delete, the Compensation log record must again contain the full content of the tuple. Thus the tuple data gets logged twice potentially, once when the delete occurs, and again if the transaction aborts.
This brings us to the second option, which is to use logical deletes. In this solution, the tuple remains as is, but is marked as deleted. No space reservation is needed, as the tuple still exists. The space map information is updated as before, that is, at the time of tuple being deleted. Using logical deletes makes undo of such deletes a simple matter of resetting the deleted flag. Logging overhead is substantially reduced.
With logical deletes, however, none of the space can be released prior to the transaction commit. In contrast, with physical deletes, if logical undo is implemented, at least some of the space can be immediately released.
Whether logical or physical deletes are used, in both cases, we still have the issue of how to inform other transactions that the tuple space is still needed. In both cases, the solution is the same. The Lock Manager can be used to ascertain whether the deleted tuple is still locked. If not, then the transaction can infer that tuple delete has been committed. The Lock Manager solution works even if the ID of the transaction that deleted the tuple is unknown, as it relies upon the tuple’s Location only. If each tuple is tagged with the ID of the last transaction that updated the tuple, then it would be possible to directly query the transaction table for the status of the transaction. However in this case, the system would have to maintain the status of all transactions, even those that have committed or aborted. SimpleDBM maintains the status of only active transactions, and also does not tag tuples with the IDs of transactions. Hence, it is appropriate to use the Lock Manager solution in SimpleDBM.
Latch Ordering
If both data page and free space map page need to be updated, then the latch order is data page first, and then free space map page while holding the data page latch.
Logging of Space Map Page updates
As per [MOHA-94], space map pages should be logged using redo only log records. During normal processing, the data page update is logged first followed by the space map page update. During undo processing, the space map page update is logged first, followed by data page update. Note that this does not change the latch ordering.
| [ASTRA-76] | M.M.Astrahan, M.W.Blasgen, D.D.Chamberlin, K.P.Eswaran, J.N.Gray, P.P.Griffiths, W.F.King, R.A.Lorie, P.R.McJones, J.W.Mehl, G.R.Putzolu, I.L.Traiger, B.W.Wade AND V.Watson. System R: Relational Approach to Database Management, ACM, Copyright 1976, ACM Transactions on Database Systems, Vol 1, No. 2, June 1976, Pages 97-137. |
| [JALUTA-05] | Ibrahim Jaluta, Seppo Sippu and Eljas Soisalon-Soininen. Concurrency control and recovery for balanced B-link trees. The VLDB Journal, Volume 14, Issue 2 (April 2005), Pages: 257 - 277, ISSN:1066-8888. |
| [LEHMAN-81] | Philip L. Lehman, S. Bing Yao: Efficient Locking for Concurrent Operations on B-Trees. ACM Trans. Database Syst. 6(4): 650-670(1981) |
| [DIBY-05] | Dibyendu Majumdar: Space Management in B-Link Trees. 2005. |
| [MOHA-02] | Mohan, C. An Efficient Method for Performing Record Deletions and Updates Using Index Scans (http://www.almaden.ibm.com/u/mohan/DelIScan.pdf), Proc. 28th International Conference on Very Large Databases, Hong Kong, August 2002. |
| [BAYE-72] | Rudolf Bayer, Edward M. McCreight. Organization and Maintenance of Large Ordered Indices. Acta Inf. 1: 173-189 (1972). |
| [COMER] | Douglas Comer. The Ubiquitous B-Tree. ACM Computing Surveys. 11(2): 121-137. |
| [MOHA-92] | C.Mohan and Frank Levine. ARIES/IM: an efficient and high concurrency index management method with write-ahead logging. ACM SIGMOD Record. V21 N2, P371-380, June 1 1992. A longer version of the paper can be found at: http://www.almaden.ibm.com/u/mohan/RJ6846.pdf |
| [DAVI-92] | (1, 2) David Lomet and Betty Salzburg. Access method concurrency with recovery. ACM SIGMOD, V21 N2, p351-360, June 1 1992. |
| [ARIES] | C. Mohan, D. Haderle, B. Lindsay, H. Pirahesh and P. Schwarz. ARIES: A Transaction Recovery Method Supporting Fine-Granularity Locking and Partial Rollbacks Using Write-Ahead Logging. ACM Transactions on Database Systems, 17(1):94-162, March 1992. Also, Readings in Database Systems, Third Edition, 1998. Morgan Kaufmann Publishers. |
| [JGRAY] | (1, 2, 3, 4) Transaction Processing: Concepts and Techniques, by Jim Gray and Andreas Reuter |
| [MOHA-94] | (1, 2) C.Mohan and D.Haderle. Algorithms for Flexible Space Management in Transaction Systems Supporting Fine-Granularity Locking. In Proceedings of the International Conference on Extending Database Technology, March 1994. |
| [CAREY-96] | (1, 2) Mark L.McAuliffe, Michael J. Carey and Marvin H. Solomon. Towards Effective and Efficient Free Space Management. ACM SIGMOD Record. Proceedings of the 1996 ACM SIGMOD international conference on Management of Data, June 1996. |
| [COCKBURN] | Alistair Cockburn. Writing Effective Use Cases. |